
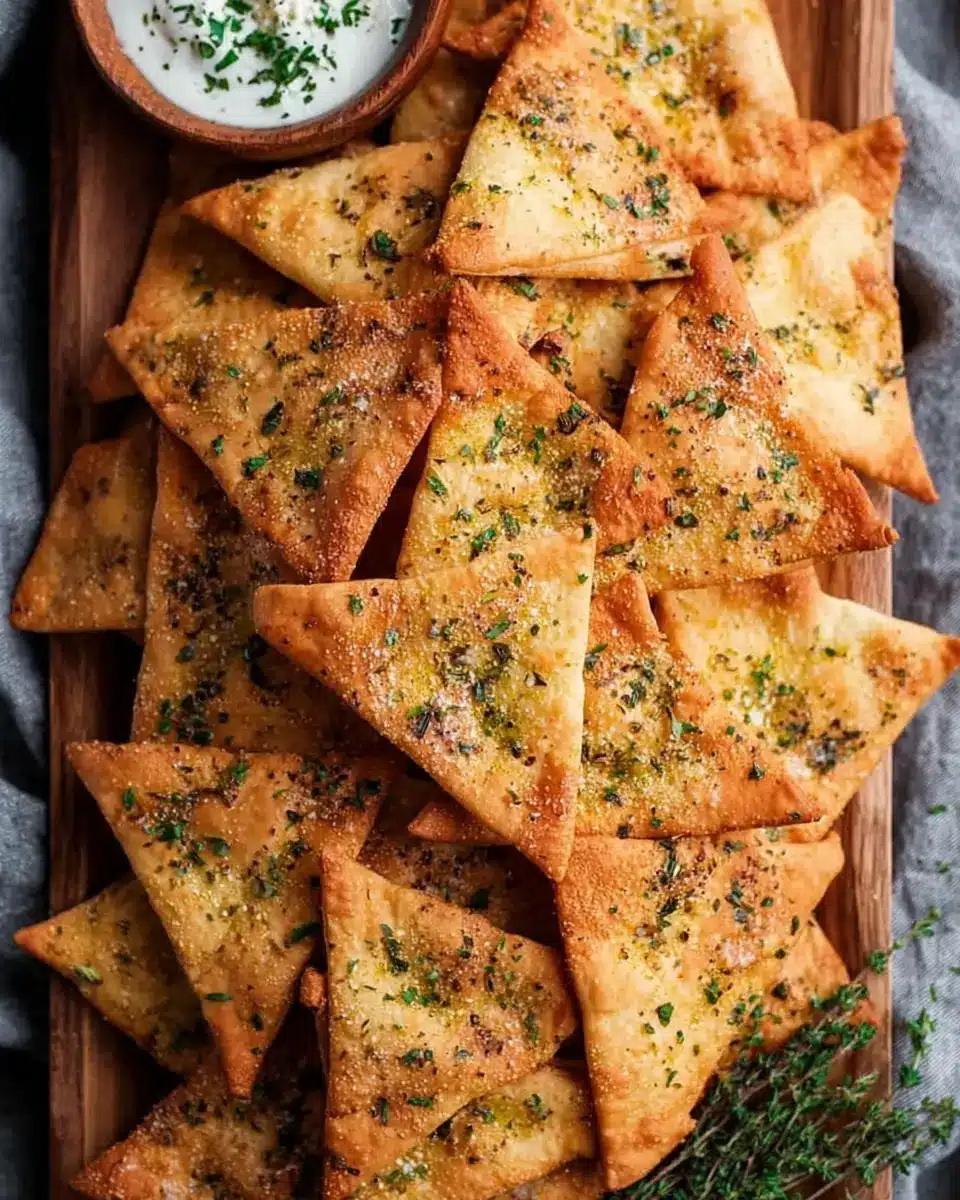
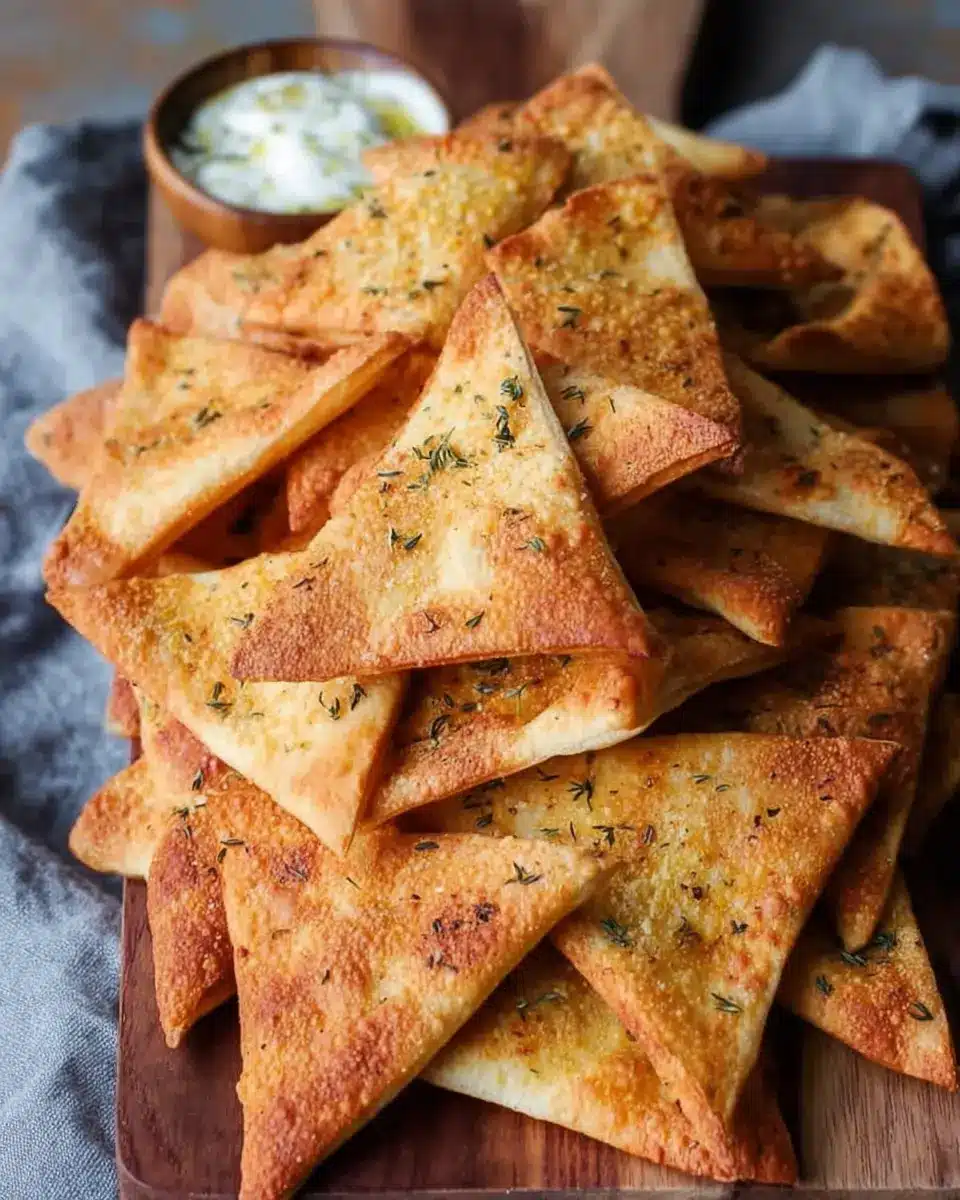
Introduction to 20 Minute Homemade Pita Chips Recipe
If you’ve ever craved a crunchy snack but wanted to avoid the overly processed options at the store, then our 20 Minute Homemade Pita Chips Recipe is about to change the game for you. These chips are not only easy to make but they also allow for customization that store-bought varieties simply can’t compete with. Imagine whipping up a delicious, fresh batch in just 20 minutes!
Why Homemade Pita Chips Are a Game Changer for Your Snacking
Homemade pita chips are the perfect balance between satisfying crunch and delicious flavor. Unlike traditional snacks, pita chips are sturdy enough to hold up against thick dips like hummus or spicy feta spreads. Plus, you have complete control over the ingredients—meaning you can adjust the oil and salt levels to fit your preferences.
Furthermore, these chips bake quickly, making them a lifesaver for unexpected guests or a late-night snack attack. A simple combination of olive oil, Za’atar, and spices elevates the flavor, while a quick baking time means you’ll have a fresh snack ready before the oven timer goes off!
For more inspiration on healthy snacking, check out this guide from the American Heart Association. Your taste buds will thank you!

Ingredients for 20 Minute Homemade Pita Chips
Creating your own homemade pita chips is a fun and rewarding way to elevate your snack game. In just 20 minutes, you can whip up these crunchy delights with ingredients you likely already have in your pantry. Here’s what you’ll need:
- 4 large pita bread pockets (white or whole wheat)
- ⅓ cup extra virgin olive oil for just the right amount of richness
- 3 tablespoons Za’atar spice blend—this will add a unique, fragrant touch
- ½ teaspoon sea salt to enhance the flavors
- ¼ teaspoon garlic powder for that delightful umami kick
- Fresh parsley (optional, for garnish and vibrant color)
These simple ingredients come together beautifully in our 20 Minute Homemade Pita Chips Recipe. Whether you're hosting friends or just enjoying a quiet night in, homemade pita chips will undoubtedly impress.
Looking for more snack ideas? Check out our guide on creating the perfect dip pairing for your pita chips!
Preparing 20 Minute Homemade Pita Chips
Making your own pita chips at home is a quick and fulfilling way to elevate your snack game. This 20 Minute Homemade Pita Chips Recipe provides a delightful crunch and a medley of flavors that store-bought chips simply can't compete with. Let's dive into how to prepare these delicious bites in just a few simple steps!
Split the Pita Pockets
To kick things off, start by laying your pita bread flat on a clean cutting board. Most pita bread consists of two thin layers, creating a pocket in the middle. Using a sharp knife or kitchen shears, carefully cut around the edge to separate these layers.
Splitting the pita into two thin rounds is crucial for achieving that perfect crunch. If you skip this step, your chips may end up being soft in the middle while the outsides burn, which is not the texture we’re aiming for!
Slice into Triangles
Now that you have your pita rounds, stack them on top of each other to save time. Cut the stack in half, then into quarters, and finally into eighths. This method gives you uniform little triangles that look fantastic and cook evenly.
Uniformity is key! If your chips are all different sizes, some will burn while others remain chewy. Keeping them roughly the same size ensures they bake perfectly, adding another level of satisfaction when you bite into one.
Whisk the Oil and Spices
In a small bowl, mix together your extra virgin olive oil, Za’atar spice blend, sea salt, and garlic powder. Take a moment to whisk these ingredients until the spices are well-blended into the oil. The fragrant aroma of Za’atar, which combines dried thyme, oregano, sesame seeds, and sumac, elevates your chips to another level.
Whisking ensures that all the spices distribute evenly, preventing clumps and giving each chip a burst of flavor. The composition of the Za’atar offers a hint of citrus from the sumac, enhancing the overall taste of your pita chips.
Coat the Bread Generously
Next, place your pita triangles in a large mixing bowl and pour the seasoned oil over the top. Using your clean hands or a silicone spatula, toss the triangles gently until they’re fully coated. Make sure to focus on the textured side of the pita—this side absorbs the oil best.
As you toss, look for that slightly translucent appearance from the oil and the specks of Za’atar on every piece. If the chips look dry after mixing, add just one more teaspoon of oil, but avoid soaking them extensively to keep the texture crisp.
Arrange the Baking Tray
Preheat your oven to 375°F (190°C). Line two large baking sheets with parchment paper to prevent sticking and aid cleanup. Arrange the pita triangles in a single layer on the trays, ensuring they don't overlap.
Avoid overcrowding the trays; steam could build up, leading to soggy chips instead of the satisfying crispness we all crave. If you have too many chips for one tray, it’s better to bake them in two separate batches for optimal results.
Toast to Golden Perfection
Place the trays in the oven and let them bake for about 8 to 12 minutes. Every oven is uniquely different, so start checking around the 8-minute mark. You want a light golden-brown color with crisp edges. Concentrate on that tantalizing smell of toasted sesame and herbs wafting from the oven—it's always a good indicator that your chips are turning out great!
Cool for the Ultimate Crunch
Once they’re out of the oven, let the chips cool on the baking sheets for at least five minutes. This is essential! During cooling, any remaining moisture will escape, leaving you with a light, crunchy treat. If you nibble too soon, you might find a chewy texture instead.
Serve and Store
Finally, these 20 Minute Homemade Pita Chips are best enjoyed while fresh. Pair them with hummus, baba ganoush, or a zesty salsa for an enjoyable snacking experience. If you have leftovers (which might be unlikely), allow them to cool completely before putting them in an airtight container where they can last up to five days.
If they lose their crunch due to humidity, a quick three-minute warm-up in the oven will refresh them beautifully. Happy snacking!
Variations on 20 Minute Homemade Pita Chips
Spice up your snack game with these delicious variations of your 20 Minute Homemade Pita Chips Recipe. Each twist adds unique flavors sure to impress your taste buds.
Spicy Pita Chips with Chili Powder
Craving a little heat? Add a tablespoon of chili powder to your seasoned oil during the whisking stage. This simple adjustment transforms your chic, crunchy chips into a fiery delight. Pair your spicy pita chips with cooling dips like yogurt or sour cream for a perfect balance.
Herb-Infused Pita Chips with Fresh Rosemary
For a fragrant touch, finely chop fresh rosemary and mix it into your oil blend. This herb-infused option elevates the flavor profile, creating a delightful aroma. Try serving these roasted marvels alongside a tangy olive tapenade for a sophisticated snack experience.
These variations are just the beginning—feel free to experiment with other spices, like cumin or smoked paprika, for an unforgettable twist. Happy snacking!
Cooking Tips and Notes for 20 Minute Homemade Pita Chips
Best Practices for Achieving Crispy Texture
To ensure your 20 Minute Homemade Pita Chips achieve that addictive crunch, always split the pita into thin layers. This crucial step allows for even baking and maximizes crispiness. Also, when tossing the pita triangles in the seasoned oil, make sure they are coated uniformly. Don't skimp on baking time—keep an eye out for a golden hue, as that's when they’re at their best!
How to Avoid Soggy Chips
To dodge the soggy chip scenario, don't overcrowd your baking sheets. Spacing is key; if they touch, steam gets trapped, ruining the crunch factor. Remember to let your chips cool on the baking sheet after removing them from the oven for extra crispiness. If they lose their crunch later, a quick trip back to the oven can bring them back to life!
For more expert tips on cooking and baking, check out resources like Serious Eats or America's Test Kitchen.
Serving Suggestions for 20 Minute Homemade Pita Chips
Pairing Options with Dips and Spreads
When you whip up your 20 Minute Homemade Pita Chips, be sure to serve them alongside a variety of dips and spreads. They shine when paired with classic options like hummus, baba ganoush, or tzatziki. You can also elevate your offering with a spicy feta dip or a funky olive tapenade. For a twist, try serving them with guacamole—the crunchy texture of the chips contrasts beautifully with the creaminess of the avocado.
Serving at Parties or Casual Gatherings
These crispy delights are perfect for parties or casual gatherings. Arrange your pita chips in a vibrant serving bowl, and consider garnishing the bowl with fresh herbs like parsley for added color. For an interactive twist, create a DIY dipping station where guests can choose their favorite dips—this adds a fun touch and encourages mingling. Don't forget to let your friends know about the 20 Minute Homemade Pita Chips Recipe, so they can make their own crunchy snacks at home!
Time Breakdown for 20 Minute Homemade Pita Chips
Preparation Time
Getting started is a breeze! You’ll need about 5 minutes to prepare your pita bread, slice it into triangles, and whisk together the flavorful oil and spice mixture.
Baking Time
Once your chips are ready to go, the baking will take approximately 8 to 12 minutes in the oven. It’s the perfect time to clean up your kitchen or set the table for your upcoming gathering.
Total Time
In less than 20 minutes, you can have deliciously crispy homemade pita chips ready to impress your guests or satisfy your snack cravings. Isn’t it great to whip up a treat in no time?
For more quick and tasty recipes, check out this article on easy snacks.
Nutritional Facts for 20 Minute Homemade Pita Chips
Calories per Serving
Each serving of these 20 Minute Homemade Pita Chips contains approximately 150 calories. This makes them a lighter, guilt-free snacking option compared to traditional chips, allowing you to enjoy your dips without piling on excess calories.
Ingredients' Nutritional Benefits
- Pita Bread: A great source of complex carbohydrates and fiber, particularly if you choose whole wheat. It aids digestion and provides sustained energy.
- Olive Oil: Packed with healthy fats, particularly monounsaturated fats, which are known to support heart health. Extra virgin olive oil also contains antioxidants that can combat inflammation.
- Za’atar: This spice blend not only adds flavor but also contains thyme, known for its antimicrobial properties, and sesame seeds, which are rich in calcium and magnesium.
- Sea Salt: While moderation is key, sea salt can help maintain proper hydration and electrolyte balance in the body.
- Garlic Powder: Not just for flavor, garlic is linked to numerous health benefits, including immune support and improved heart health.
Making these pita chips at home allows you to enjoy a delicious snack that can be tailored to your dietary needs, making them an excellent choice for any gathering. For more healthy snacking ideas, consider checking out sources like Healthline or Mayo Clinic.
FAQs about 20 Minute Homemade Pita Chips
Can I use different spices for flavor variations?
Absolutely! The beauty of this 20 Minute Homemade Pita Chips Recipe lies in its versatility. Feel free to experiment with spices like smoked paprika, cumin, or even a dash of chili powder for a spicy kick. Italian herbs like oregano and basil can create a Mediterranean vibe, while a sprinkle of cinnamon and sugar could transform them into a sweet treat.
How should I store leftover pita chips?
To maintain their crunch, store your pita chips in an airtight container or a zip-top bag at room temperature. They can stay fresh for up to five days. Just make sure they're completely cool before sealing them up to prevent moisture buildup.
How can I refresh stale pita chips?
If your chips have lost their crunch, don’t worry! Simply pop them in a preheated oven at 350°F for about three minutes. This quick reheating should help restore that delightful crispiness and bring back the wonderful texture you enjoyed right out of the oven.
For more tips on snacks, consider checking out some healthy alternatives to store-bought snacks.
Conclusion on 20 Minute Homemade Pita Chips
Making your own 20 Minute Homemade Pita Chips opens up a world of flavor and texture that store-bought options simply can’t match. You enjoy freshness, customizable seasoning, and a delightful crunch—all in just 20 minutes. Whether paired with dips or enjoyed solo, these chips elevate snacking effortlessly!
Recap of Benefits of Making Homemade Pita Chips
Creating pita chips at home is not just satisfying; it's also a healthier choice. You control the ingredients, tailoring the oil and spice levels to your preference—plus, you skip any preservatives found in commercial brands. With just a few minutes and simple ingredients, you can craft a gourmet snack that impresses guests or satisfies your late-night cravings.
For more tips on homemade snacks, you might find resources from the USDA helpful for nutritional guidance. And if you're looking for creative dip recipes to pair with your pita chips, check out Once Upon A Chef.

20 Minute Homemade Pita Chips Recipe
Equipment
- oven
- baking sheets
- Parchment paper
- mixing bowl
- whisk
- knife
Ingredients
Pita Chips Ingredients
- 4 large pita bread pockets white or whole wheat
- ⅓ cup extra virgin olive oil
- 3 tablespoons Za’atar spice blend
- ½ teaspoon sea salt
- ¼ teaspoon garlic powder
- fresh parsley optional for garnish
Instructions
Preparation Steps
- Preheat your oven to 375°F.
- Split the pita bread into two thin rounds.
- Cut the pita into small, uniform triangles.
- In a small bowl, whisk together the olive oil, Za’atar, sea salt, and garlic powder.
- Place the pita triangles in a mixing bowl and pour the seasoned oil over them, tossing gently.
- Spread the pita triangles on lined baking sheets in a single layer.
- Bake for 8 to 12 minutes until golden brown and crispy.
- Let the chips cool on the baking sheet for at least 5 minutes before serving.


Leave a Reply