
Introduction to Cheesy Garlic Knots
If you’re a young professional juggling work, social life, and perhaps a new hobby or two, finding time to whip up delicious meals can feel overwhelming. Enter cheesy garlic knots — the perfect solution for busy weeknights or easy weekend entertaining. Not only are these mouthwatering bites packed with flavor, but they also come together with minimal effort, allowing you to savor that homemade touch without sacrificing your precious time.
Imagine coming home after a long day and the aroma of fresh garlic and warm bread greets you at the door. These knots are not just a side; they're an experience! According to culinary experts at Bon Appétit, the combination of garlic and cheese can elevate your dish from simple to sensational, making these knots a real crowd-pleaser.
Whether you’re pairing them with your favorite soup, serving them as a delightful appetizer, or just indulging during a cozy movie night, cheesy garlic knots are versatile enough to fit any occasion. Plus, who doesn’t love a warm, cheesy treat that’s easy to share? So grab your apron, and let’s dive into the delicious world of these irresistible knots!
Ingredients for Cheesy Garlic Knots
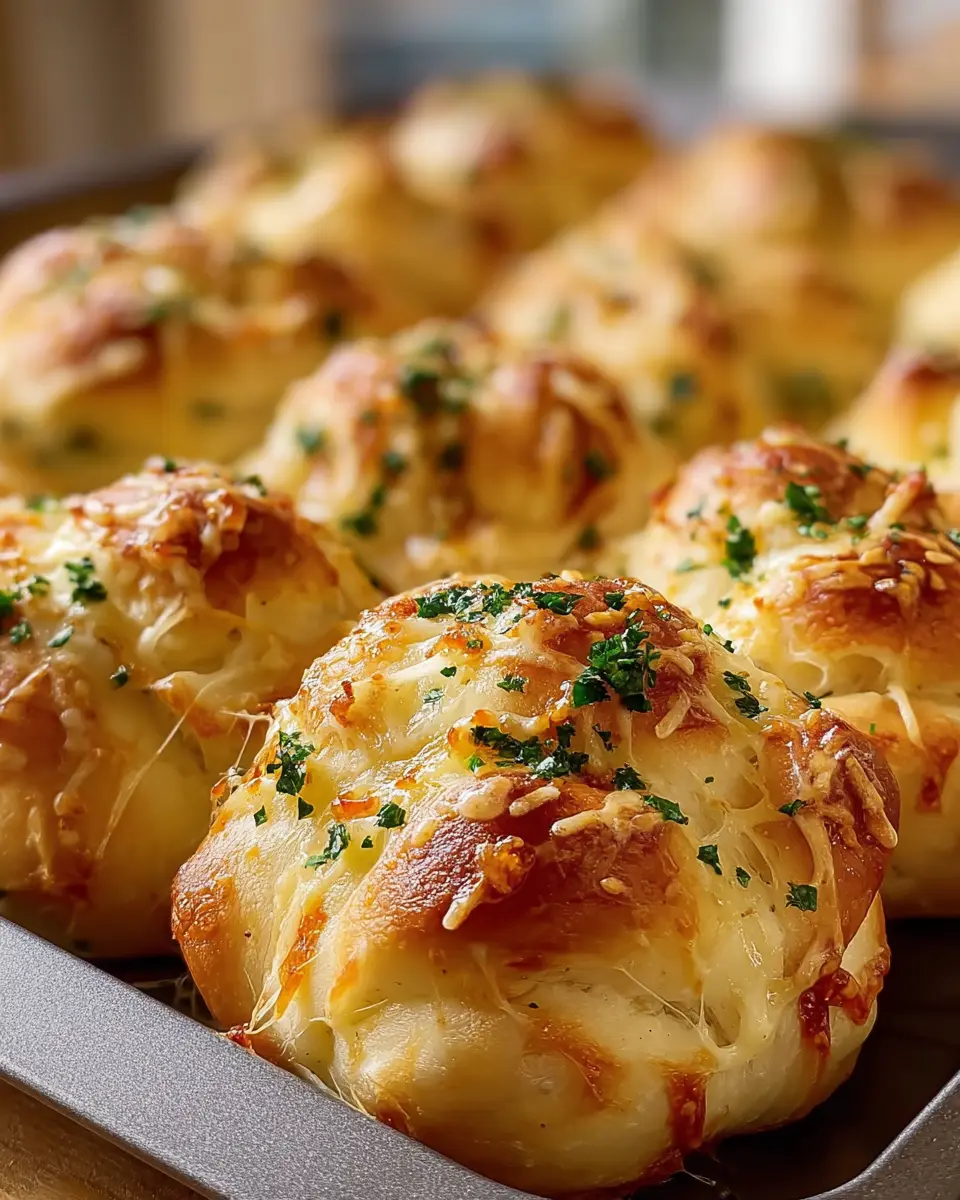
Essential ingredients for delightful cheesy garlic knots
Creating the ultimate cheesy garlic knots begins with a handful of essential ingredients that come together to make this delightful dish. Here's what you'll need:
- Warm water: 1 cup + 2 tablespoons (270ml), ideally between 100–110°F (38–43°C)
- Platinum Yeast: 2 and ¼ teaspoons (7g) of instant yeast from Red Star will give your dough that perfect rise.
- Granulated sugar: Just 1 tablespoon helps feed the yeast.
- Olive oil or melted butter: 3 tablespoons for richness.
- Salt: 1 teaspoon adds flavor.
- Garlic powder: Use 1 teaspoon for that aromatic kick.
- Bread flour: 3 and ⅓ cups (plus extra for dusting) ensures a chewy texture.
These staples make up the heart of your cheesy garlic knots. Don't forget to have melted butter and minced garlic on hand as well for that irresistible drizzle.
Optional toppings to elevate your cheese experience
To take your cheesy garlic knots to the next level, consider these optional toppings:
- Grated Parmesan cheese: A generous sprinkle adds a nutty, savory finish.
- Chopped fresh parsley: This provides a vibrant pop of color and freshness.
Feel free to explore further with toppings like crushed red pepper for a hint of heat or experiment with various herbs. Your knots are only limited by your imagination!
For some expert tips, check out Food Network for inspiring ideas and variations. Happy baking!
Step-by-step Preparation of Cheesy Garlic Knots
Activate your yeast for perfect rise
The first step in creating your delicious cheesy garlic knots is to activate the yeast. Begin by mixing 1 cup + 2 tablespoons of warm water (between 100–110°F/38–43°C) with 2 and ¼ teaspoons of Platinum Yeast from Red Star and 1 tablespoon of granulated sugar in a large mixing bowl. Let it sit for about 5 to 10 minutes until a frothy layer forms on top. This bubbling is your yeast happily waking up, and it’s a crucial step to ensure your dough will rise!
Combine ingredients for the dough
Now that your yeast is ready, it's time to create the dough. Add 3 tablespoons of olive oil, 1 teaspoon of salt, and 1 teaspoon of garlic powder to the yeast mixture. Next, gradually mix in half of the 3 and ⅓ cups of bread flour until the mixture starts to take shape. It should be sticky but manageable. Slow and steady wins the race here—keep adding the remaining flour while mixing until everything is combined.
Knead the dough until smooth and elastic
Get your hands ready because it’s kneading time! Dust a clean surface with flour and turn out your dough. Knead it for about 5 to 7 minutes, until it becomes smooth and elastic. You’ll know it’s ready when it’s no longer sticky and passes the “windowpane test”—that’s when you pull a small piece to see if it stretches without tearing. This is what gives your cheesy garlic knots that lovely chewy texture.
Let the dough rise in a cozy spot
Place your kneaded dough in a greased bowl and cover it with a kitchen towel. It’s time for the dough to rest and rise! Find a warm spot in your kitchen and let it rise for about an hour or until it doubles in size. Imagine the anticipation—your dough is transforming into fluffy goodness!
Shape your garlic knots with flair
Once risen, it’s time to shape your knots! Gently punch down the dough to release any air and divide it into 12 equal pieces. Roll each piece into a rope and then tie it into a neat little knot. If you want to get creative, try adding some twists or turns to make them unique. It’s like bringing a personal touch to your cheesy garlic knots!
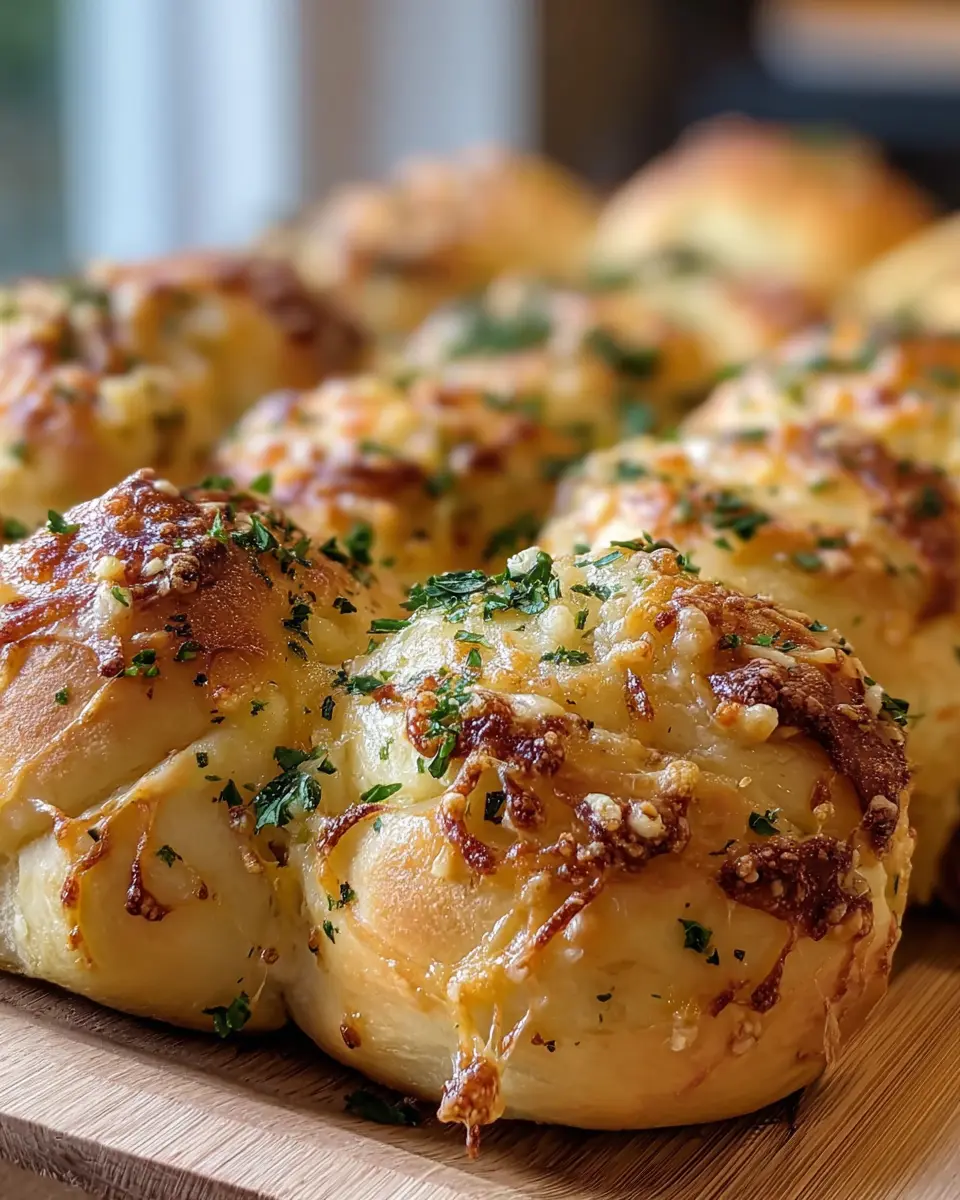
Bake to golden perfection
Preheat your oven to 425°F (220°C). Arrange your garlic knots on a baking sheet lined with parchment. Brush the tops with 5 tablespoons of melted unsalted butter, then sprinkle minced garlic and Italian seasoning over each one. This step is where the magic happens! Bake for 15 to 20 minutes until they’re golden brown and crispy on the outside but soft on the inside.
Finally, garnish with some grated Parmesan or fresh parsley for that extra flair, and serve warm. You’ll be in for a treat that’s perfect for a cozy dinner or a casual gathering with friends!
Want more tips on baking? Check out additional resources on yeast activation and artisan bread making for a deeper dive!
Variations of Cheesy Garlic Knots
Spinach and Cheese Stuffed Knots
If you’re looking to add a burst of flavor and nutrition to your cheesy garlic knots, try stuffing them with a vibrant spinach and cheese mixture. Simply sauté fresh spinach until wilted, then mix it with ricotta and mozzarella cheese. Once your dough is ready, roll it out, place a spoonful of the filling in the center, and knot it up. This delicious variation combines the beloved flavors of garlic and cheese with the goodness of greens!
Pesto and Mozzarella Garlic Knots
Elevate your cheesy garlic knots with a swirl of nutty pesto! Spread some basil pesto in the dough before knotting; it adds a wonderful herby flavor that pairs perfectly with the gooey mozzarella. The combination of garlic, oil, and pesto creates a mouthwatering twist that will impress your friends at the next gathering. Pair with marinara for a dipping sauce, and enjoy a delightful, flavor-packed experience!
For more ideas, check out Bon Appétit and Food Network for inspiration!
Cooking Tips and Notes for Cheesy Garlic Knots
Troubleshooting Dough Consistency
Getting the right dough consistency is crucial for your cheesy garlic knots. If your dough feels too sticky, don’t hesitate to sprinkle in a little more flour while kneading until it’s manageable. On the other hand, if it seems too dry and crumbly, a splash of warm water can help bring it together. Finding that balance creates the perfect texture.
Timing Tips for Perfect Baking
Baking time can vary, so keep an eye on those knots! Aim for a golden brown color, which usually takes about 15 to 20 minutes in a preheated oven at 425°F (220°C). For an extra touch, try rotating your baking sheet halfway through to ensure even cooking. Don't forget, everyone’s oven is a little different—trust your instincts!
For more tips on achieving the perfect bake, check out resources like King Arthur Baking for expert advice!

Serving Suggestions for Cheesy Garlic Knots
Dipping Sauces That Complement Your Knots
To elevate your cheesy garlic knots, consider pairing them with some fantastic dipping sauces. Here are a few options to tantalize your taste buds:
- Marinara Sauce: A classic choice, the tanginess of marinara perfectly offsets the cheesy richness.
- Ranch Dressing: For a creamy twist, ranch offers a zesty, delicious contrast.
- Garlic Butter Sauce: If you can’t get enough garlic, a warm garlic butter dip is a dream come true.
Pairing Cheesy Garlic Knots with Meals
These delightful knots can be the star of any meal! They pair wonderfully with:
- Pizza: Serve them alongside your favorite pizza for the ultimate comfort food combo.
- Salads: A fresh, crisp salad adds a lovely balance to the indulgent knots.
- Pasta Dishes: Complement your main course of spaghetti or fettuccine with these cheesy delights.
These suggestions not only enhance your dining experience but also make your meals feel more complete. Enjoy experimenting with different combinations!
Time Breakdown for Cheesy Garlic Knots
Preparation time
Get your trusty mixing bowl ready! You’ll need about 10 minutes to whip up the dough and get everything mixed together.
Rising time
Now, let’s give that dough some love. It needs to rise for around 1 hour until it’s nice and fluffy—think of it as a little dough vacation.
Baking time
Once your knots are prepped, bake them for 15 to 20 minutes until they turn that perfect shade of golden brown.
Total time
From start to finish, you’re looking at about 1 hour and 30 minutes to enjoy these cheesy garlic knots fresh from your oven. Great snack time awaits!
Nutritional Facts for Cheesy Garlic Knots
Calories per serving
Each garlic knot packs approximately 150 calories, making it a delightful treat that won't completely derail your meal plans. Perfect for sharing or enjoying as a snack, these knots are as fantastic for parties as they are for a cozy night in.
Protein content
You can expect around 4 grams of protein per cheesy garlic knot. While not a primary source of protein, these knots are a tasty indulgence to complement a balanced meal—think about pairing them with a hearty salad or a bowl of your favorite pasta!
Sodium levels
With about 290 milligrams of sodium per serving, these cheesy garlic knots can fit into most dietary plans. If you're concerned about sodium intake, consider reducing the salt in your recipe or serving them alongside a fresh salad to balance things out.
FAQs about Cheesy Garlic Knots
Can I make the dough ahead of time?
Absolutely! You can prepare the dough ahead and keep it in the refrigerator for up to 24 hours. Just let it come to room temperature before you shape and bake your cheesy garlic knots. This method not only saves time but also enhances the flavor as it cold ferments.
What’s the best way to store leftovers?
To keep your cheesy garlic knots delicious, store any leftovers in an airtight container at room temperature for about 2 days. For longer storage, toss them in the fridge, where they’ll stay fresh for up to a week. When you’re ready to munch, just warm them up in the oven for a few minutes to regain that lovely softness!
How can I customize the flavors?
Customizing your cheesy garlic knots is a fun way to explore! Add some chopped herbs like rosemary or basil for a fresh twist, or sprinkle crushed red pepper flakes for a bit of heat. Feel free to mix different cheeses—like mozzarella and cheddar—or even add some turkey bacon or chicken ham for a savory punch. Similar recipes can be found on food blogs like The Pioneer Woman or Minimalist Baker for more inspiration!
Conclusion on Cheesy Garlic Knots
In conclusion, cheesy garlic knots are not only a delicious treat but also a fun cooking project that you can whip up in no time. With their golden crust and savory aroma, they’re perfect for sharing—though you might just want to keep them all for yourself! Enjoy every cheesy bite!

Cheesy garlic knots
Equipment
- large bowl
- Baking Sheet
- kitchen towel
Ingredients
Main ingredients
- 1 cup warm water between 100–110°F (38–43°C)
- 2 ¼ teaspoons Platinum Yeast from Red Star instant yeast
- 1 Tablespoon granulated sugar
- 3 Tablespoons olive oil or melted butter
- 1 teaspoon salt
- 1 teaspoon garlic powder
- 3 ⅓ cups bread flour spooned and leveled plus more for hands and surface
- 5 Tablespoons unsalted butter melted
- 3 garlic cloves minced garlic or ½ teaspoon garlic powder
- 1 teaspoon Italian seasoning plus ¼ teaspoon salt
Instructions
Instructions
- First, grab a large bowl and mix your warm water, yeast, and sugar. Let it sit for like 5 to 10 minutes until it looks all frothy on top. That’s your green light that the yeast is awake and ready.
- Next, add in your olive oil, salt, garlic powder, and half the flour to that yeast mixture. Stir it up till it starts coming together, kinda sticky but manageable. Then slowly add the rest of the flour while you mix.
- Time to knead your dough for 5 to 7 minutes on a clean surface, dusted with a bit of flour. You’ll feel it go smooth and elastic under your hands—that’s your dough telling you it’s ready.
- Pop the dough in a greased bowl and cover it with a kitchen towel. Find a warm cozy spot and let it rise for about an hour or until it’s doubled in size. You’ll notice it almost looks like a big fluffy cloud waiting to turn into garlic gold.
- When your dough is risen, punch it down gently to release air, and divide it into 12 pieces. Roll each into a little rope, then tie it into a knot. It feels kinda fun, like playing with edible jewelry.
- Place the knots on a baking sheet lined with parchment paper. Brush the tops with that melted butter, and sprinkle your minced garlic and Italian seasoning on each knot. These seasonings bring that classic garlic knot vibe we all crave.
- Preheat your oven to 425°F (220°C), then slide your tray in and bake for about 15 to 20 minutes until the knots are golden brown. You’ll see the edges crisp up, but the inside stays soft and tender.
- Right when they’re done, you can sprinkle on Parmesan or fresh parsley if you want, then serve warm. You’re gonna love how these taste fresh from your own kitchen!
Leave a Reply