
Introduction to Chocolate Cake Pops
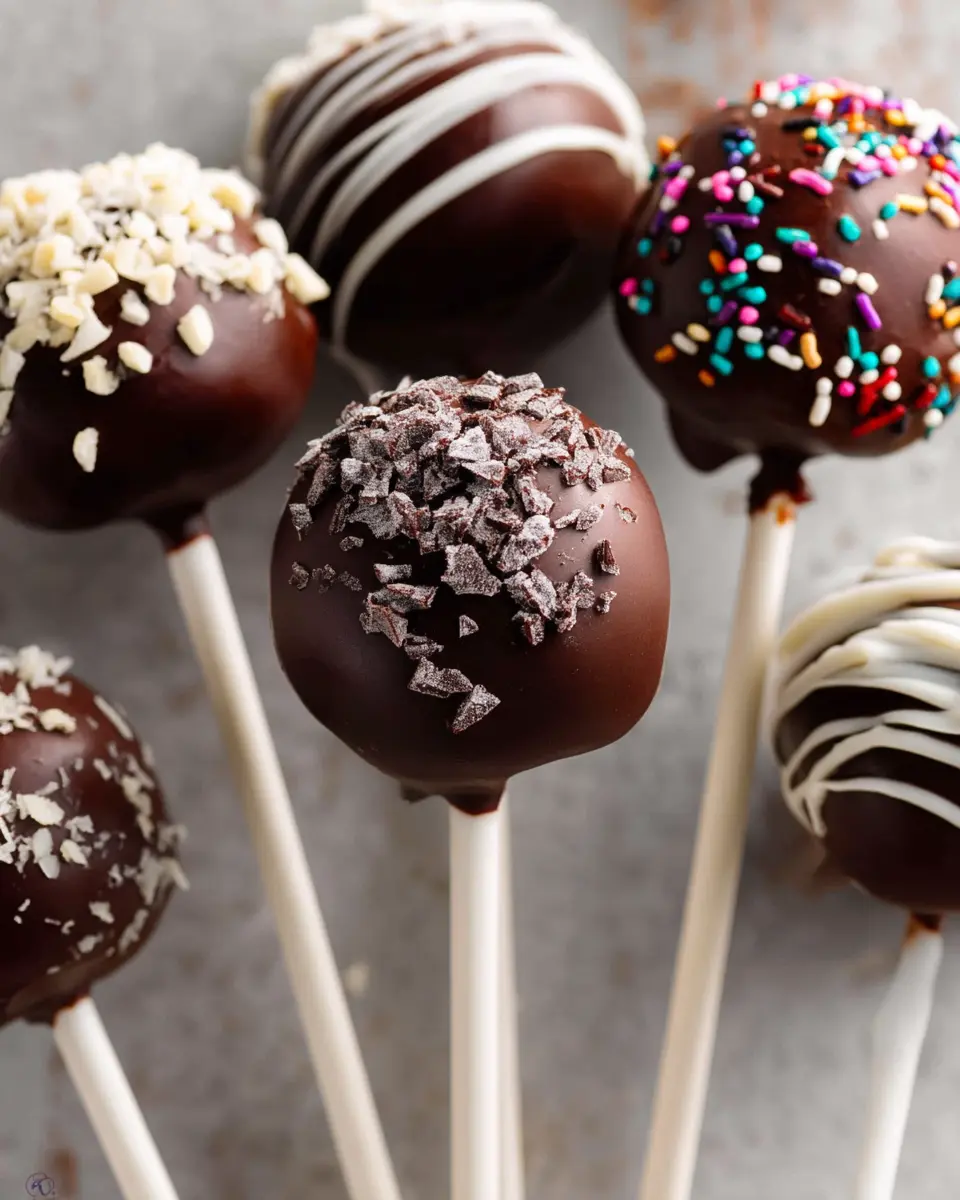
If you’ve ever craved a bite-sized dessert that combines the rich flavor of chocolate cake with a delightful coating, chocolate cake pops are your answer! These little treats are more than just a fun way to enjoy cake; they’re a fantastic choice for celebrations, parties, or simply a sweet snack.
Why Chocolate Cake Pops are the Perfect Treat
Chocolate cake pops have an incredible appeal for several reasons. Firstly, their portability makes them an ideal on-the-go snack; no plates or forks are required! They are also customizable, allowing you to decorate with various sprinkles or drizzles, perfect for personalizing your creation to suit any occasion.
Additionally, these treats are a hit with all age groups, ensuring that everyone—from kids to adults—will find joy in their fudgy goodness. You can easily prepare them ahead of time, making them a stress-free option for your next gathering. Did you know that cake pops can be stored in the refrigerator for up to a week? This makes them a convenient choice for busy lifestyles.
For more tips on mastering cake pops and cake recipes, check out Sally’s Baking Addiction to explore variations and additional decorating ideas. You’ll soon discover that chocolate cake pops are not just desserts—they’re an experience!
Ingredients for Chocolate Cake Pops
When it comes to creating irresistible chocolate cake pops, having the right ingredients is key to achieving that decadent flavor and delightful texture. Let’s break down the essentials you’ll need for this satisfying treat.
Key ingredients for the cake
To bake a luscious cake base for your chocolate cake pops, gather these essential ingredients:
- All-purpose flour: Provides structure and stability.
- Granulated sugar: Sweetens the cake and contributes to moisture.
- Cocoa powder: For rich chocolate flavor, use unsweetened natural cocoa.
- Baking soda and salt: Help with rising and enhance the overall flavor.
- Canola or vegetable oil: Keeps your cake moist and tender.
- Eggs: Aid in binding and adding richness.
- Vanilla extract: Elevates the flavor profile.
- Hot water: Activates the cocoa powder and makes a smoother batter.
Essential ingredients for the frosting
For a creamy and delicious frosting to bind your cake, you’ll need:
- Unsalted butter: The base for a smooth frosting.
- Confectioners' sugar: Sweetens and thickens the frosting.
- Cocoa powder: Adds that chocolatey essence.
- Heavy cream or milk: Adjusts consistency for a smooth spread.
- Vanilla extract: Gives a lovely finishing touch to the flavor.
Tasty options for coating
Finally, let’s talk about coating! Here are a few delicious options for your chocolate cake pops:
- Candy melts: These are easy to use and come in various colors.
- Semi-sweet chocolate bars: For a more gourmet touch, melt and dip your cake pops for a rich chocolate experience.
- Sprinkles: Add a festive touch to your pops and play with colors!
With these ingredients in hand, you're well on your way to creating delightful chocolate cake pops that are sure to impress! If you're looking for ideas on where to source quality ingredients, check out Sally's Baking Addiction for top-notch recommendations. Happy baking!
Preparing Chocolate Cake Pops
Making chocolate cake pops is a fun and delightful baking adventure! These bite-sized treats bring joy to gatherings and make for great gifts. Let’s break down the steps to creating these delicious sweets, ensuring a smooth experience from start to finish.
Gather Your Ingredients
Before diving in, it’s crucial to have everything ready. Here’s what you’ll need for your chocolate cake pops:
- 1 cup (125g) all-purpose flour
- 1 cup (200g) granulated sugar
- 6 Tablespoons (32g) unsweetened cocoa powder
- ½ teaspoon baking soda
- ¼ teaspoon salt
- ½ cup (120ml) oil (canola or melted coconut)
- 2 large eggs
- 1 teaspoon vanilla extract
- ½ cup (120ml) hot water
For the frosting:
- 6 Tablespoons (85g) unsalted butter
- ¾ cup (90g) confectioners’ sugar
- ½ cup (41g) cocoa powder
- 2–3 teaspoons heavy cream
- ½ teaspoon vanilla extract
Lastly, for coating:
- 24 ounces (680g) candy melts
- sprinkles for decoration
Bake the Chocolate Cake
Start by preheating your oven to 350°F (177°C). Grease a 9-inch round or square pan, making it easy for the cake to release later. In a large bowl, whisk the flour, sugar, cocoa powder, baking soda, and salt together. In a separate medium bowl, mix the oil, eggs, and vanilla. Pour the wet ingredients into the dry, adding in the hot water last. Mix until just combined, ensuring there are no dry pockets. Pour the batter into your prepared pan and bake for 25-27 minutes. Cool it completely on a wire rack—patience here is key!
Prepare the Chocolate Frosting
While your cake cools, whip up the chocolate frosting. Use a mixer to beat the softened butter until creamy, about two minutes. Gradually add the confectioners' sugar, cocoa powder, and vanilla, mixing on low first. Then, increase the speed and beat until fluffy—about three minutes. If it gets too thick, add a teaspoon of cream or milk to loosen it.
Combine the Cake and Frosting
Once the cake is cool, crumble it into the bowl with the frosting, breaking apart any large lumps. Turn your mixer to low and beat until the cake and frosting are well incorporated—this should create a deliciously moist mixture that will be easy to form into balls.
Form the Cake Balls
Using a tablespoon, measure out the cake mixture and roll it into balls. Place these on a lined baking sheet and pop them into the fridge for about two hours, or freeze for one hour. Keeping them chilled makes dipping easier later!
Dip and Decorate the Cake Pops
Melt your candy melts in a microwave-safe bowl, stirring every 20 seconds until smooth. Remove just a few chilled cake balls at a time for dipping. Dip one end of a lollipop stick into the melted candy, then insert it into the cake ball. Ensure it goes halfway through. Coat the cake ball in the melted candy and let the excess drip off. Sprinkle or decorate as desired. Stand the pops upright to set.
And there you have it—your chocolate cake pops are ready to impress! They make tasty additions to any dessert table or a charming surprise for someone special. Enjoy the process and get creative with your decorations!

Variations on Chocolate Cake Pops
Fun with flavors: vanilla or red velvet cake pops
Why not switch things up? Instead of traditional chocolate cake pops, you can use vanilla or red velvet cake for a delightful twist! Vanilla gives a classic sweetness, while red velvet adds a rich, velvety texture and a pop of color. Simply substitute your recipe's main ingredients with these alternatives, and enjoy a flavor adventure that's always sure to impress at parties or gatherings.
Seasonal flair: pumpkin spice or peppermint cake pops
Elevate your cake pops for the seasons! Try pumpkin spice cake pops in the fall, combining the warm spices of cinnamon and nutmeg for a cozy treat. In winter, peppermint cake pops are a festive delight, with a refreshing mint flavor that pairs wonderfully with chocolate. You can incorporate crushed peppermint candies or a hint of peppermint extract into your coating for that extra seasonal touch. Check out insider tips on seasonal baking at Baking Therapy.
Baking Notes for Chocolate Cake Pops
Making Ahead: Tips for Storage
If you plan to whip up these delicious chocolate cake pops ahead of time, you’re in luck! Bake the cake a day before and allow it to cool completely. Store it covered at room temperature. For the undipped cake balls, refrigerate for up to 2 days or freeze them for up to 6 weeks. Just remember to let them thaw in the fridge before dipping.
Importance of Cooling Times
Cooling time is essential in cake pop preparation. Allow the baked cake to cool entirely before crumbling; otherwise, you might end up with a gooey mixture. Additionally, chilling the cake balls is crucial before dipping them in chocolate; this helps the coating adhere better and keeps the cake pop from falling apart. Happy baking!

Serving suggestions for Chocolate Cake Pops
Perfect for parties and gatherings
Making chocolate cake pops is always a hit at parties, whether it's a birthday, baby shower, or casual get-together. These delightful bites are easy to handle, making them perfect finger foods. You can set up a fun DIY station where guests can decorate their cake pops with a variety of toppings, such as nuts, edible glitter, or colorful sprinkles. According to a survey by Party City, more than 70% of millennials appreciate interactive food stations at events, so don’t hesitate to get creative!
Creative plating ideas
When presenting your chocolate cake pops, opt for vibrant display ideas to grab attention. Use a stylish cake stand or a decorative foam block to hold them upright. Consider pairing them with fresh fruits or edible flowers for a pop of color. Displaying in clear jars or whimsical containers can also enhance the visual appeal. If you want to take it up a notch, try arranging them on a tiered serving tray or wrapping them in cellophane for a lovely gift. For more tips on plating, check out Food52’s guide on creative serving ideas.
Elevate the cake pop experience with these serving suggestions, and watch as your gatherings transform into memorable events!
Tips for Making Perfect Chocolate Cake Pops
Avoiding Common Pitfalls
To ensure your chocolate cake pops turn out perfect, keep a few things in mind. First, make sure to crumble your cooled cake thoroughly; large lumps can lead to uneven coating. Second, resist the temptation to skip chilling the cake balls; they need to be firm to hold their shape during dipping. Lastly, if the coating cracks, it’s likely too hot—always let it cool slightly before dipping.
Temperature Management for Dipping
Proper temperature management is crucial for the success of your chocolate cake pops. After melting the coating, allow it to cool for a few minutes. If it’s too hot, it can cause the cake ball to fall apart or create a messy finish. Keep your cake balls cold from the fridge, taking out only a few at a time to dip. This will help maintain their structure while you work. For more insights on candy coating, check out this guide on melting chocolate effectively.
Time Details for Chocolate Cake Pops
Preparation Time
Before you dive into making your chocolate cake pops, set aside about 30 minutes for preparation. This includes gathering your ingredients, mixing your batter, and making the frosting.
Baking and Cooling Time
Once your cake is in the oven, it will bake for 25 to 27 minutes. Don’t forget to let it cool completely afterward, which might take an extra 30 minutes to 1 hour.
Total Time
In total, you’re looking at approximately 2 hours and 30 minutes from start to finish, including prep, bake time, cooling, and assembling your delightful pops. Perfect for an afternoon treat or a fun gathering!
For further details, check out Sally's Baking Addiction, which offers excellent tips on measuring ingredients accurately!
Nutritional Information for Chocolate Cake Pops
When indulging in chocolate cake pops, it's good to know a bit about their nutritional content. These delightful treats can be enjoyed in moderation. Here’s a quick snapshot of what you can expect:
Calories
Each cake pop typically contains around 150-200 calories, depending on the ingredients and portion size. Perfect for a sweet treat!
Sugar Content
You'll find about 12-15 grams of sugar per pop, mainly from the frosting and candy coating, making it a satisfyingly sweet bite.
Protein
While not a protein powerhouse, each chocolate cake pop offers 2-3 grams of protein, thanks to the eggs and flour, adding some nutritional balance to your dessert!
Understanding the nutritional information can enhance your experience, allowing you to enjoy these delicious chocolate cake pops while being mindful of your dietary choices. For more insights on ingredients, check out reliable sources like the USDA FoodData Central for detailed nutrition facts. Dive in and savor every bite!
FAQs about Chocolate Cake Pops
How can I get my cake pops to stay on the stick?
To ensure your cake pops don’t slide off their sticks, dip the tip of the stick into the coating before inserting it into the cake ball. This will create a bit of a “seal” that helps hold everything together. Also, chilling the cake balls in the fridge for at least an hour before dipping can help them firm up and cling better to the stick.
What can I substitute for ingredients in the recipe?
You can easily adapt the chocolate cake pops recipe! For a gluten-free version, swap the all-purpose flour for a gluten-free blend. If you need a dairy-free recipe, use coconut or almond milk in the frosting and replace the butter with a plant-based alternative. For sugar alternatives, consider using coconut sugar or a suitable sweetener like honey or maple syrup.
How long do chocolate cake pops last?
Once you’ve made your delightful cake pops, they can be stored in the refrigerator for up to a week. Just make sure to keep them sealed in an airtight container to maintain their freshness. If you're looking to save them for later, they freeze beautifully, so feel free to pop them in the freezer for up to six weeks! For more tips on storage, check out this comprehensive guide on food storage best practices.
Conclusion on Chocolate Cake Pops
Creating delightful chocolate cake pops is not only satisfying but also a fun activity for gatherings or celebrations. With a bit of patience and creativity, you can craft these tasty treats that are sure to impress. Enjoy experimenting with flavors, coatings, and decorations for a personalized touch!

Chocolate Cake Pops
Equipment
- 9 inch round pan
- Electric mixer
- Glass Mixing Bowls
- whisk
- Baking Sheet
- silicone baking mat
- Glass measuring cup
- Double boiler
- Lollipop sticks
Ingredients
Cake
- 1 cup all-purpose flour spooned & leveled
- 1 cup granulated sugar
- 6 Tablespoons unsweetened natural cocoa powder ⅓ cup + 1 Tbsp
- ½ teaspoon baking soda
- ¼ teaspoon salt
- ½ cup canola oil or vegetable, or melted coconut oil
- 2 large eggs at room temperature
- 1 teaspoon pure vanilla extract
- ½ cup hot water
Chocolate Frosting
- 6 Tablespoons unsalted butter softened to room temperature
- ¾ cup confectioners’ sugar
- ½ cup unsweetened natural cocoa powder or Dutch-process
- 2-3 teaspoons heavy cream or milk
- ½ teaspoon pure vanilla extract
Coating
- 24 ounces candy melts or semi-sweet chocolate bars
- sprinkles
Instructions
Making Cake Pops
- Preheat oven to 350°F (177°C). Grease a 9-inch pan (round or square or 9-inch springform pan).
- Whisk the flour, granulated sugar, cocoa powder, baking soda, and salt together in a large bowl. Set aside. Whisk the oil, eggs, and vanilla together in a medium bowl. Pour the wet ingredients into the dry ingredients, add the hot water, and whisk everything together until combined.
- Pour the batter evenly into the prepared pan. Bake for 25–27 minutes or until a toothpick inserted in the center comes out clean. Allow the cake to cool completely in the pan set on a wire rack.
- With a handheld or stand mixer fitted with a paddle attachment, beat the butter on medium speed until creamy, about 2 minutes. Add confectioners’ sugar, cocoa powder, 2 teaspoons of heavy cream/milk, and vanilla extract, and beat on low speed until incorporated. Increase to high speed and beat for 3 minutes until it really comes together.
- Crumble the cooled cake into the bowl on top of the frosting. Turn the mixer on low speed and beat the frosting and cake crumbles together until combined.
- Measure 1 scant Tablespoon (20g) of moist cake mixture and roll into a ball. Place cake balls on a lined baking sheet. Refrigerate for 2 hours or freeze for 1 hour.
- Melt the coating in a 2-cup liquid measuring cup. Microwave in 20-second increments, stirring after every 20 seconds until completely melted. Let the coating cool down for a few minutes before dipping.
- Remove only 2–3 cake balls from the refrigerator at a time. Dip one end of a lollipop stick about ½ inch into the coating, then insert into the center of the cake ball. Dip the cake ball into the coating until it is completely covered, then tap the stick against the edge of the measuring cup to allow excess coating to drip off.
- Coating will set within an hour. Store cake pops in the refrigerator for up to 1 week.

Leave a Reply