
Introduction to Classic Patty Melt
Why a Patty Melt is the Ultimate Comfort Food
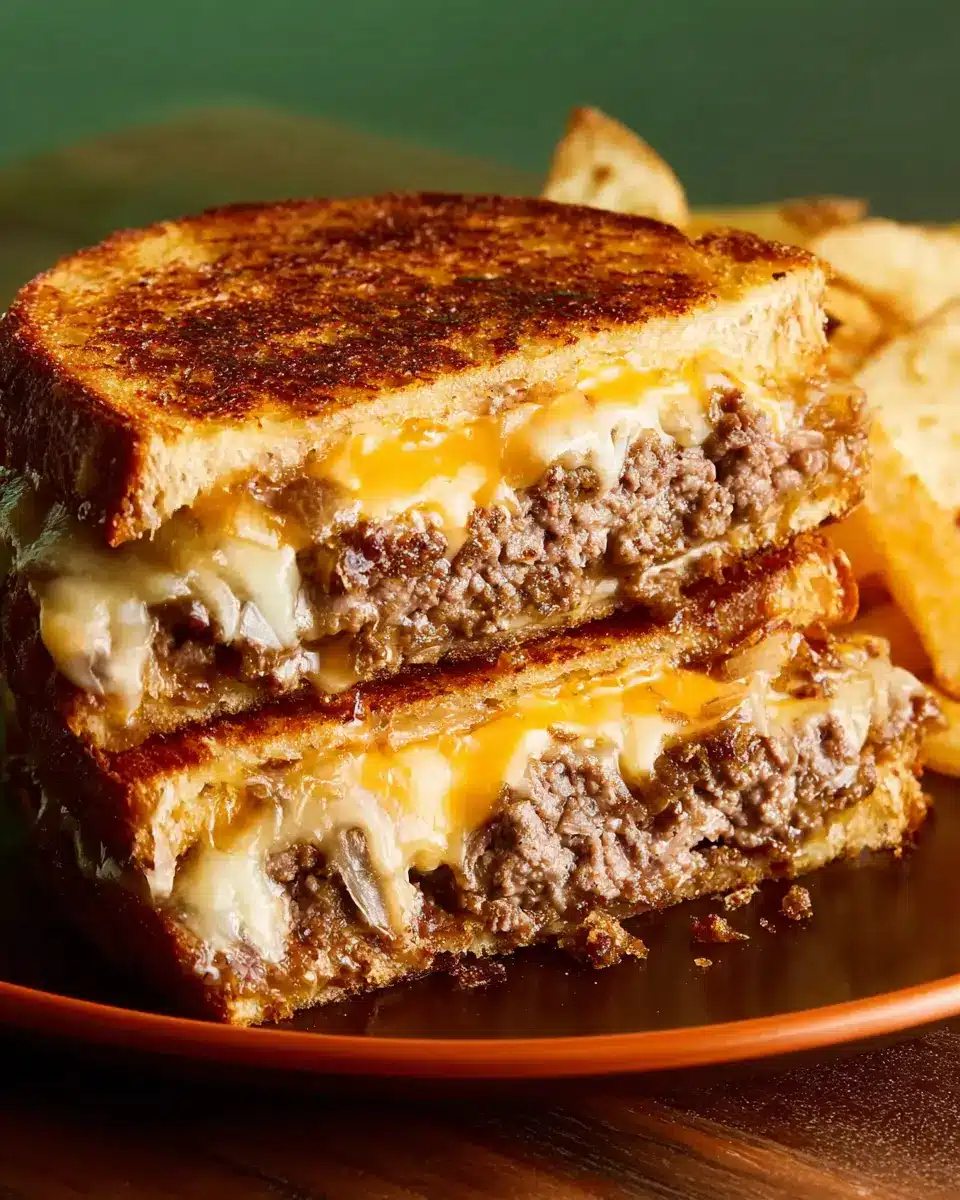
If you've ever bitten into a classic patty melt, you know there’s something magical about it. This beloved sandwich, famous for its delicious combination of juicy beef patties, caramelized onions, and melty Swiss cheese, perfectly embodies what comfort food should be: warm, satisfying, and oh-so-tasty.
The beautiful thing about the patty melt is its versatility. It’s like the love child between a classic burger and a grilled cheese—making it the ideal choice for a cozy night in or a quick meal after a long day. Have a taste for adventure? You can customize it with your favorite toppings like mustard or even swap in a turkey bacon for a twist.
Comfort food is not just about flavor; it often holds memories. Perhaps you enjoyed a patty melt during late-night diner visits with friends or your mom made them when you were feeling under the weather. As you prepare this classic dish, you're not just cooking; you're creating moments. Did you know that the history of the patty melt dates back to the 1940s? You can explore more about its fascinating origins here.
Grab your skillet, and let’s embrace the nostalgia while whipping up this fabulous comfort meal!

Essential Ingredients for a Delicious Patty Melt
Creating the perfect classic patty melt is all about using the right ingredients. Let’s break down what you need to make this mouthwatering sandwich a reality.
-
Sweet Yellow Onion: The foundation of your flavor. Thinly sliced onions, cooked to a deep golden brown, bring a natural sweetness that balances beautifully with the savory beef.
-
Butter: You’ll want this for that crispy, golden bread. Using butter instead of oil not only enhances flavor but also gives that irresistible crunch.
-
Apple Cider Vinegar: This one’s optional, but a splash adds depth to the onions. It cuts through the richness and complements the other ingredients nicely.
-
90/10 Ground Beef: Choose a blend that’s lean yet tender. The right beef blend is essential for a juicy patty that won’t dry out during cooking.
-
Swiss Cheese: Melts perfectly and adds a creamy richness, making this sandwich a delight to the senses.
-
Sandwich Bread: Opt for sturdy slices that can hold up to the fillings. Classic options include rye or Texas toast.
Don’t forget about a little mustard if you like a tangy kick! For more tips on creating the perfect patty melt, check out this link for expert advice.
Preparing a Classic Patty Melt
Sauté the onions to perfection
The foundation of any great classic patty melt lies in beautifully caramelized onions. Start by heating a large cast-iron skillet over medium to medium heat. Add 1 tablespoon of butter and toss in your thinly sliced sweet yellow onion. You’ll want to cook these gems for about 25 minutes, stirring occasionally to ensure even browning. If you find they’re starting to burn, simply reduce the heat to medium-low.
A delightful tip: just as the onions begin to reach that rich, deep brown color, splash in a tablespoon of apple cider vinegar. This not only enhances the sweetness but also adds a tangy complexity that elevates their flavor. Once done, remove them from the skillet and set aside. For more tips on caramelizing onions, check out this cooking guide.
Form and season the beef patties
Next, it’s time to shape your beef patties! Begin with 8 ounces of 90/10 ground beef, forming two thin patties that mimic the size of your bread. Whether you're a seasoned chef or a weekend cook, don’t skip seasoning; add ¼ teaspoon each of salt and black pepper to both sides of the patties. A pinch of spice goes a long way in enhancing the flavor of your classic patty melt!
When the onions are done, crank up the heat to medium-high and place the seasoned patties in the skillet. Cook them for about 3 minutes on one side, then flip and give the other side the same treatment. Thin patties cook quickly, so keep an eye on them!
Butter the bread for that golden finish
After your patties are perfectly cooked, it’s time to turn the spotlight to the bread! Wipe the skillet clean and add the remaining tablespoon of butter. Once melted, line up the slices of sandwich bread, allowing one side of each to soak up that lovely buttery goodness.
For the next step, feel free to remove two slices to start building your sandwich, or assemble one at a time if that suits your kitchen style better. It's all about creating that crunchy, golden crisp we love in a patty melt!
Assemble your mouthwatering sandwich
Now comes the fun part—assembly! On each of the buttered slices still in the skillet, start layering: a slice of Swiss cheese, a juicy beef patty, half of those beautifully caramelized onions, and finally, another slice of Swiss on top. Cap it off with your buttered slice of bread.
Can you smell it already? There's something special about the layers taking shape, and that melty cheese is the star of this show!
Cook to achieve melty goodness
With your sandwiches layered up, keep cooking them over medium-low heat for about 3 to 4 minutes on each side. Your goal? A perfectly toasted exterior complemented by that ooey-gooey melted cheese inside. The key is to take your time; let those flavors mingle together, and don't rush the process.
Once golden brown, slice your sandwiches in half and serve immediately. The warmth and melty goodness of your classic patty melt await—enjoy every bite and watch as your friends and family dive in!

Variations on the Classic Patty Melt
Vegetarian Patty Melt Options
Craving a classic patty melt, but looking for a vegetarian twist? No problem! Swap out the beef for a hearty black bean or quinoa patty. These options pack a flavorful punch and make for a satisfying meal. Try adding roasted vegetables like zucchini and bell peppers for additional texture and taste. For a creamy kick, spread some avocado on the bread before toasting!
Spicy Patty Melt Delights
If you like to spice things up, turn your classic patty melt into a zesty delight! Mix chopped jalapeños into your beef patty or opt for pepper jack cheese to bring the heat. Add a drizzle of sriracha or a slice of spicy chicken ham to amplify the flavor. Trust me, your taste buds will thank you!
For more creative variations, check out this resource on vegetarian and plant-based swaps.
Cooking Tips and Notes for a Classic Patty Melt
Best practices for sautéing onions
When cooking onions for your classic patty melt, patience is key. Start with medium heat and add a pinch of salt—this helps draw out moisture and enhances flavor. Stir occasionally to keep them from sticking and burning. For deeper caramelization, consider adding a splash of low-sodium broth or a bit of sugar. Remember, it takes about 25 minutes to achieve that gorgeous golden brown color. If you're short on time, check out Serious Eats for a quick sautéing guide.
Tips for achieving the perfect burger texture
To craft the ultimate juicy burger for your classic patty melt, choose 80/20 ground beef for a balanced fat-to-protein ratio. Shape your patties gently without overworking the meat; this keeps them tender. Make a small indentation in the center to prevent puffing up during cooking. Finally, grill or pan-sear over medium-high heat for that perfect crust, about 3 minutes per side. An instant-read thermometer should read 160°F for a well-done patty. For more on achieving the perfect burger, visit America's Test Kitchen.
Incorporating these tips will elevate your classic patty melt to restaurant-quality deliciousness!
Serving Suggestions for a Classic Patty Melt
Pairing sides with your patty melt
When it comes to enjoying a classic patty melt, the right side dishes can elevate your meal. Crisp, golden French fries or sweet potato fries add a satisfying crunch. For a healthier option, try a fresh side salad tossed with a tangy vinaigrette. Pickles, whether dill or bread-and-butter, provide a zesty contrast that balances the richness of the melted cheese.
Creative condiment ideas
Don't stick to the usual ketchup! Opt for smoky chipotle mayo or tangy garlic aioli to enhance the flavors of your classic patty melt. A dollop of creamy horseradish or spicy mustard can also take it up a notch. For something unique, how about a spoonful of homemade relish? It’s a delightful surprise that brings a sweet and sour punch to your sandwich.
For more inspiration, check out Serious Eats for a range of tasty sides and condiment combinations!
Time Breakdown for Classic Patty Melt
Preparation Time
Get ready for about 15 minutes of prep work. You'll be slicing onions, seasoning your beef, and buttering the bread. It’s all about setting the stage for a mouthwatering experience!
Cooking Time
Cooking this classic patty melt takes around 15-20 minutes. This includes caramelizing the onions to perfection and grilling the sandwiches until they're crispy and oozing with cheese.
Total Time
In just 30-35 minutes, you’ll have a delicious classic patty melt ready to serve! Perfect for a quick weeknight dinner or a weekend indulgence with friends.
Want to dive deeper into the nuances of perfecting your patty melt? Check out resources from Serious Eats for more tips on sandwich-making excellence!
Nutritional Facts for Classic Patty Melt
When diving into a classic patty melt, it's good to know what to expect nutritionally. Here’s a quick rundown of the key components:
Calories
A single serving of a classic patty melt packs approximately 560 calories. This hearty sandwich is quite filling, making it a satisfying option for lunch or dinner.
Protein
With around 30 grams per serving, this sandwich is a protein powerhouse! The combination of ground beef and Swiss cheese gives you a hearty boost.
Sodium
On the flip side, keep an eye on sodium levels. One classic patty melt may contain about 1,200 mg of sodium, primarily from the cheese and seasoning. If you're watching your salt intake, consider adding less salt or using low-sodium cheese options.
For more insights, check out the USDA’s FoodData Central for detailed nutritional information on various ingredients. Enjoy your delicious meal while being mindful of your nutritional goals!
FAQs about Classic Patty Melt
What type of cheese is best for a patty melt?
When it comes to a classic patty melt, Swiss cheese takes the crown for its rich, creamy flavor, which melts beautifully. If you’re feeling adventurous, try adding a slice of American or cheddar cheese for an extra layer of flavor. Ultimately, the cheese you choose can really enhance the overall taste, so pick your favorite!
Can I make the patties ahead of time?
Absolutely! You can prepare your beef patties in advance by shaping them and storing them in the fridge for up to 24 hours. If you need to store them longer, consider freezing them. Just remember to separate each patty with parchment paper to prevent sticking. Cooking them fresh will yield the best taste, but prepped patties make weeknight cooking a breeze!
What bread works best for a classic patty melt?
For an authentic experience, opt for hearty sandwich bread like rye or sourdough. Their sturdy structure can handle the juicy beef and gooey cheese without falling apart. You’ll get that delightful crispy texture that contrasts perfectly with the soft filling. Don’t be afraid to experiment with your favorite bread!
For more tips on sandwich making, check out sites like Serious Eats for inspiration.
Conclusion on Classic Patty Melt
Indulging in a classic patty melt brings comfort and nostalgia to your dining table. Rich flavors from caramelized onions and melted Swiss cheese complement the juicy beef patties perfectly. Whether you enjoy it on a casual weeknight or serve it at a gathering, this sandwich is sure to satisfy everyone’s cravings!
For more delicious meal ideas, check out this recipe collection!

Classic Patty Melt
Equipment
- cast iron skillet
Ingredients
Vegetables
- 1 large sweet yellow onion thinly sliced
- 2 tablespoons butter divided
Condiments
- 1 tablespoon apple cider vinegar
- Mustard optional
Meat
- 8 ounces 90/10 ground beef
- ¼ teaspoon salt
- ¼ teaspoon black pepper
Bread & Cheese
- 4 slices sandwich bread
- 4 slices Swiss cheese
Instructions
Preparation
- In a large cast-iron skillet set over medium to medium heat, add 1 tablespoon of butter and sliced onions. Cook onions, stirring occasionally, for about 25 minutes until they are a deep brown color. If the onions are burning on spots, you might need to turn your heat down to medium-low. Near the end of cooking (about 5 minutes), add apple cider vinegar and stir to combine. Then remove from the skillet.
- Shape ground beef into two thin 4-ounce patties that are roughly the shape of your bread. Season patties with salt and pepper. When onions are done in your skillet, set the heat to medium-high and add the patties. Cook for 3 minutes per side. If your patties are thin, that should be enough time to cook them through. Remove patties when done.
- Wipe your skillet clean and add the last tablespoon of butter to the skillet. Once the butter melts, add all the bread slices to the skillet, so one side of each slice is coated with butter. Remove two of the four pieces of bread and start building your sandwich on the two pieces remaining in the skillet.
- On each slice of bread remaining in the skillet, add a slice of Swiss cheese, a patty, half of the caramelized onions, and top with the second slice of Swiss cheese. Top each sandwich with the slice of bread removed from the skillet earlier, buttered side up.
- Over medium-low heat, cook the sandwiches for 3 to 4 minutes per side until the bread is toasted and the cheese is melted.
- Slice sandwiches in half and serve immediately while warm.


Leave a Reply