
Introduction to Cheeseburger Sliders
Let's talk about why cheeseburger sliders are a game-changer for young professionals looking for tasty, efficient meals. In today's fast-paced world, balancing work, hobbies, and social outings can be a juggling act. That’s where these delicious sliders come in—they’re easy to make and perfect for any occasion, from a cozy night in to a casual gathering with friends.
Why Cheeseburger Sliders Are the Perfect Homemade Meal for Young Professionals
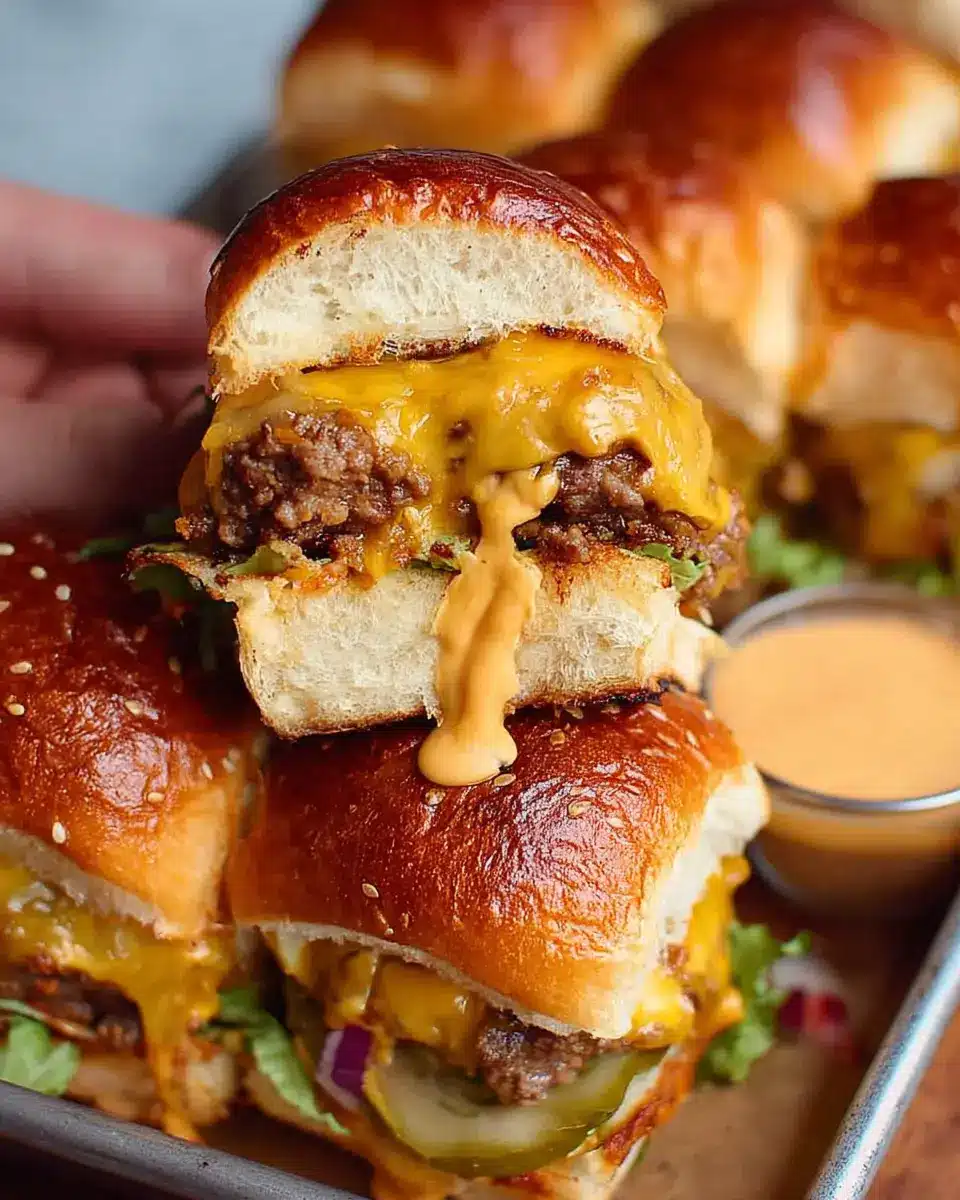
If you’ve ever craved a hearty meal after a long day at the office, you know that you don’t always want to spend hours in the kitchen. These cheeseburger sliders require minimal prep while delivering maximum flavor. Each bite bursts with juicy beef, melted cheese, and perfectly caramelized onions—all sandwiched between soft, sweet rolls.
Moreover, these sliders are super customizable! Whether you’re a fan of classic flavors or looking to add unique toppings, you can easily tailor them to your taste. Plus, they reheat beautifully, making leftovers just as fantastic.
For handy cooking tips and more meal ideas, check out sites like Epicurious and Serious Eats. Embrace the convenience and joy of cooking with cheeseburger sliders—your taste buds will thank you!

Ingredients for Cheeseburger Sliders
Essential ingredients for a tasty slider experience
When you're craving a comforting meal that's both bite-sized and delicious, cheeseburger sliders are the perfect solution! To craft these mouthwatering mini delights, you'll need a few key ingredients that come together harmoniously.
- Ground Beef: The heart of your slider—opt for lean ground beef for a balance of flavor and healthiness.
- Cheeses: A combination of shredded cheddar and American cheese will deliver that gooey, melty goodness everyone loves.
- Hawaiian Sweet Rolls: These soft, slightly sweet rolls create the ultimate bun for your sliders, perfectly holding all the ingredients together.
- Condiments: Don’t forget the flavor enhancers! Yellow mustard, Worcestershire sauce, and garlic powder add depth and zest.
- Pickles and Onions: Sliced dill pickles and caramelized onions are essential for that classic cheeseburger taste.
With these ingredients at hand, you're well on your way to crafting sliders that will impress your friends and satisfy your cravings. Want to elevate your slider game? Consider browsing this guide for tips on ingredient variations and serving suggestions!
Step-by-Step Preparation for Cheeseburger Sliders
Creating mouthwatering cheeseburger sliders can feel like a daunting task, but fear not! I'll guide you through each step to make the process feel like a breeze. Let's dive in!
Preheat and Prepare Your Kitchen
First things first, you’ll want to start by getting your space ready. Preheat your oven to 350°F (about 175°C). It might sound basic, but a properly preheated oven is crucial to ensure your sliders bake evenly and achieve that perfect golden-brown finish. While the oven warms up, take a moment to gather your ingredients (having everything at hand makes for a smoother cooking experience!). You’ll find the full list above, but keep the Hawaiian sweet rolls and cheese handy, as they are essential for that delicious cheesy bite.
Caramelizing the Onions
Next, let’s focus on those sweet and savory caramelized onions. In a large skillet over high heat, add 2 teaspoons of your neutral oil, just until it shimmers. Toss in your thinly sliced onions, cooking them for about 4 to 6 minutes. Stir occasionally to avoid burning; we want them beautifully charred in spots. Once they reach that perfect balance of sweetness and flavor, transfer them to a plate. If you haven't tried caramelizing onions before, you're in for a treat, as they add incredible depth to your cheeseburger sliders!
Cooking the Ground Beef
Now, reduce the heat to medium-high and add another teaspoon of oil along with 1 pound of lean ground beef to the pan. Break the beef into small pieces with a wooden spoon and cook until it's browned and cooked through, roughly 5 minutes. It’s the perfect time to add your mustard, Worcestershire sauce, garlic powder, kosher salt, and black pepper. Let it all cook together for an additional 2 minutes—it’ll deepen the flavors and create that deliciously rich filling for your sliders!
Assembling the Sliders
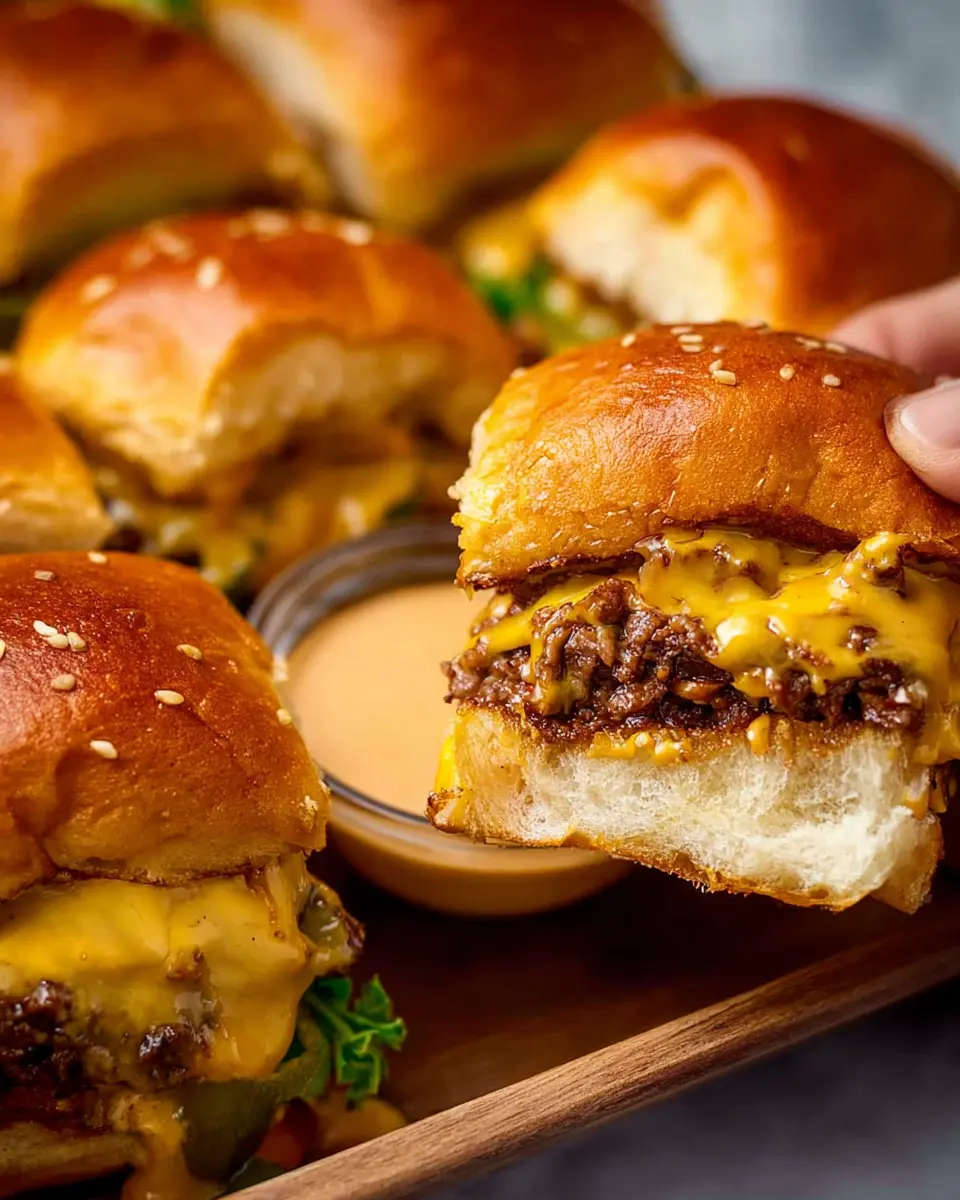
Assembly time! Grab your Hawaiian rolls and slice them horizontally, keeping them connected. Place the bottom half in a baking dish and layer on 8 slices of American cheese, followed by the caramelized onions, then the beef mixture. Don't forget to top with 1 ½ cups of shredded medium cheddar cheese and sliced dill pickles for an extra crunch. Place the top half of the rolls on before brushing them with melted butter or olive oil and sprinkling with sesame seeds.
Baking to Perfection
Cover your baking dish tightly with aluminum foil, and bake in your preheated oven for 10 minutes. This step helps melt all that gooey cheese beautifully. Afterward, remove the foil and let your cheeseburger sliders bake for an additional 12–15 minutes until the tops turn golden brown and delightful.
And there you have it! Your sliders are just about ready. Serve them hot with your homemade burger sauce for an unbeatable snack or appetizer. Happy cooking!
Variations on Cheeseburger Sliders
Cheeseburger Sliders with Turkey Bacon
Want to shake things up? Try adding turkey bacon to your cheeseburger sliders! The savory crunch of crispy turkey bacon pairs beautifully with the cheesy goodness and juicy beef. Simply layer crispy turkey bacon on top of the cooked beef mixture before adding your other toppings. This twist not only enhances flavor but also offers a slightly healthier option for your slider fans.
Spicy Jalapeño Cheeseburger Sliders
If you enjoy a spicy kick, spicy jalapeño cheeseburger sliders are just the ticket! Incorporate sliced jalapeños into your beef mixture or add them as a topping for an extra layer of heat. You can even use pepper jack cheese instead of the traditional cheddar for that creamy, spicy flavor fusion. Perfect for game day or any casual get-together, these sliders will definitely impress your friends!
For more ideas on delicious slider variations, check out Food Network for their creative recipes!
Cooking Tips and Notes for Cheeseburger Sliders
Make-ahead tips for busy professionals
For those juggling work and meal prep, cheeseburger sliders are your best friend! Cook the onions and beef up to a day in advance—just store them in separate airtight containers in the fridge. Reheat before assembling to save time. You can also whip up the burger sauce and keep it chilled for up to four days. It’ll be ready for dipping when your sliders are hot and fresh!
Storage suggestions for leftovers
If you’re lucky enough to have leftovers, store them in an airtight container in the fridge for up to three days. Reheating in the oven is best for keeping the slider buns from getting soggy. With just a little planning, these tasty cheeseburger sliders can easily fit into your busy week! For more meal prep inspiration, check out sites like Well Plated for extra tips.
Serving Suggestions for Cheeseburger Sliders
Pairing Sliders with Delicious Sides
Elevate your cheeseburger sliders with the perfect side dishes! Consider classic French fries, crispy sweet potato fries, or a vibrant coleslaw to balance the richness of the sliders. For a healthier twist, fresh fruit salads or a simple green salad dressed in vinaigrette can offer a refreshing contrast. And if you're feeling adventurous, why not add some spicy onion rings? They’ll certainly spice up your gathering!
Presentation Tips to Impress Your Friends
To make your cheeseburger sliders a showstopper, opt for a wooden cutting board or a chic platter. Arrange the sliders in a cascading pattern and garnish with fresh herbs like parsley or cilantro for a pop of color. You can even create a small condiment station with your homemade burger sauce, keeping everything organized and inviting. Little touches like these can turn a simple meal into a delightful dining experience!
Time Breakdown for Cheeseburger Sliders
Preparation time
Get ready to dive into flavor with just 15 minutes of prep! You’ll be chopping onions, mixing seasonings, and assembling everything you need for delectable cheeseburger sliders.
Cooking time
Once prepped, these sliders take about 25 minutes to cook. That’s just enough time to sneak in a quick break or prep your favorite sides!
Total time
In just 40 minutes, you’ll have a scrumptious batch of cheeseburger sliders ready to serve. Perfect for quick weeknight meals or casual gatherings with friends.
Now that you know the time it takes, how about getting started on your own delicious batch? You can find more cooking tips and inspiration here.
Nutritional Facts for Cheeseburger Sliders
Calories per serving
Each cheeseburger slider contains approximately 250 calories. This hearty little delight can fit seamlessly into a balanced meal, especially when paired with a side salad or veggie sticks.
Protein content
With about 14 grams of protein per slider, these cheeseburger sliders not only satisfy your taste buds but also help fuel your muscles and keep you feeling full. This makes them a great option post-workout or after a long day.
Sodium levels
Be mindful that each slider includes approximately 600 milligrams of sodium. It's always a good idea to balance high-sodium meals with fresh ingredients and plenty of water throughout your day. Want to learn more about sodium intake? Check out resources from the American Heart Association.
Enjoy crafting and savoring these sliders while being aware of their nutritional impact!
FAQ about Cheeseburger Sliders
Can I use ground turkey instead of beef?
Absolutely! Ground turkey is a leaner alternative and works beautifully in cheeseburger sliders. Just keep in mind the flavor will differ slightly, so you might want to spice it up by adding extra seasonings or herbs for that rich taste. If you’re watching your fat intake, turkey is a great choice.
What can I serve as a side with sliders?
Pair your cheeseburger sliders with classic sides like crunchy coleslaw or crispy French fries for a well-rounded meal. If you’re feeling adventurous, try serving them with sweet potato fries or a fresh garden salad. The contrast will really elevate your slider experience!
How can I customize the burger sauce?
The beauty of the burger sauce is its versatility! Start with the base recipe, then get creative. Want a spicy kick? Add some hot sauce or diced jalapeños. For a tangy twist, mix in barbecue sauce or even garlic aioli. It’s your sauce, so make it uniquely yours!
For more ideas on slider pairings, check out Serious Eats.
Conclusion on Cheeseburger Sliders
In summary, cheeseburger sliders are the perfect crowd-pleaser for any gathering. Their combination of gooey cheese, savory beef, and fresh toppings makes them irresistible. Whether it’s game day or a casual dinner, these sliders offer flexibility and comfort, ensuring everyone leaves satisfied. Try them out—you won’t regret it!

Cheeseburger Sliders
Equipment
- large skillet
- baking dish
- Aluminum foil
- mixing bowl
Ingredients
For the cheeseburger sliders
- 1 medium yellow or red onion, halved and thinly sliced (about 2 cups)
- 6 ounces shredded medium cheddar cheese (about 1 ½ cups)
- 3 teaspoons neutral oil, such as canola or vegetable divided
- 1 pound lean ground beef
- 2 tablespoons prepared yellow mustard
- 2 teaspoons Worcestershire sauce
- ½ teaspoon garlic powder
- ½ teaspoon kosher salt
- ¼ teaspoon freshly ground black pepper
- 1 (12-ounce) package Hawaiian sweet rolls (such as King’s)
- 8 slices American cheese
- ½ cup sliced dill pickles
- 1 tablespoon melted butter or olive oil
- 2 teaspoons white sesame seeds
For the burger sauce
- ½ cup mayonnaise
- ¼ cup ketchup
- 2 tablespoons sweet pickle relish
- 1 to 2 tablespoons prepared yellow mustard
- Kosher salt
- Freshly ground black pepper
Instructions
Make the cheeseburger sliders
- Arrange a rack in the middle of the oven and heat the oven to 350°F.
- Heat 2 teaspoons of the neutral oil in a large skillet over high heat until shimmering. Add 2 cups thinly sliced yellow or red onions and cook until charred in spots, 4 to 6 minutes. Transfer to a plate.
- Reduce the heat to medium-high. Add the remaining 1 teaspoon neutral oil and 1 pound ground beef to the pan. Cook, breaking the beef up with a wooden spoon into small pieces, until cooked through, about 5 minutes. Add 2 tablespoons prepared yellow mustard, 2 teaspoons Worcestershire sauce, ½ teaspoon garlic powder, ½ teaspoon kosher salt, and ¼ teaspoon black pepper. Cook, stirring constantly, until deeply browned in spots, about 2 minutes. Remove the pan from the heat.
- Without separating the rolls, cut 1 package Hawaiian sweet dinner rolls in half horizontally with a serrated knife. Place the bottom half of the rolls cut-side up in a small rimmed baking sheet, 11x7-inch, or 9x13-inch baking dish.
- Arrange 8 American cheese slices on the bottom half of the rolls in an even layer, overlapping the slices as needed to fit. Top with the onions in an even layer. Using a slotted spoon, transfer the beef mixture evenly over the onions. Sprinkle with 1 ½ cups shredded medium cheddar cheese and top with ½ cup sliced dill pickles. Place the top half of the rolls cut-side down over the pickles.
- Brush 1 tablespoon melted butter or olive oil over the top of the rolls, then sprinkle with 2 teaspoons white sesame seeds. Cover the baking dish tightly with aluminum foil. Bake for 10 minutes. Uncover and bake until the cheese is melted and bun tops are toasted, 12 to 15 minutes.
Make the burger sauce
- Place ½ cup mayonnaise, ¼ cup ketchup, 2 tablespoons sweet pickle relish, and 1 tablespoon prepared yellow mustard in a small bowl and stir to combine. Taste and stir in up to 1 more tablespoon mustard, kosher salt, and black pepper as needed. Serve with the sliders for dipping.


Leave a Reply