
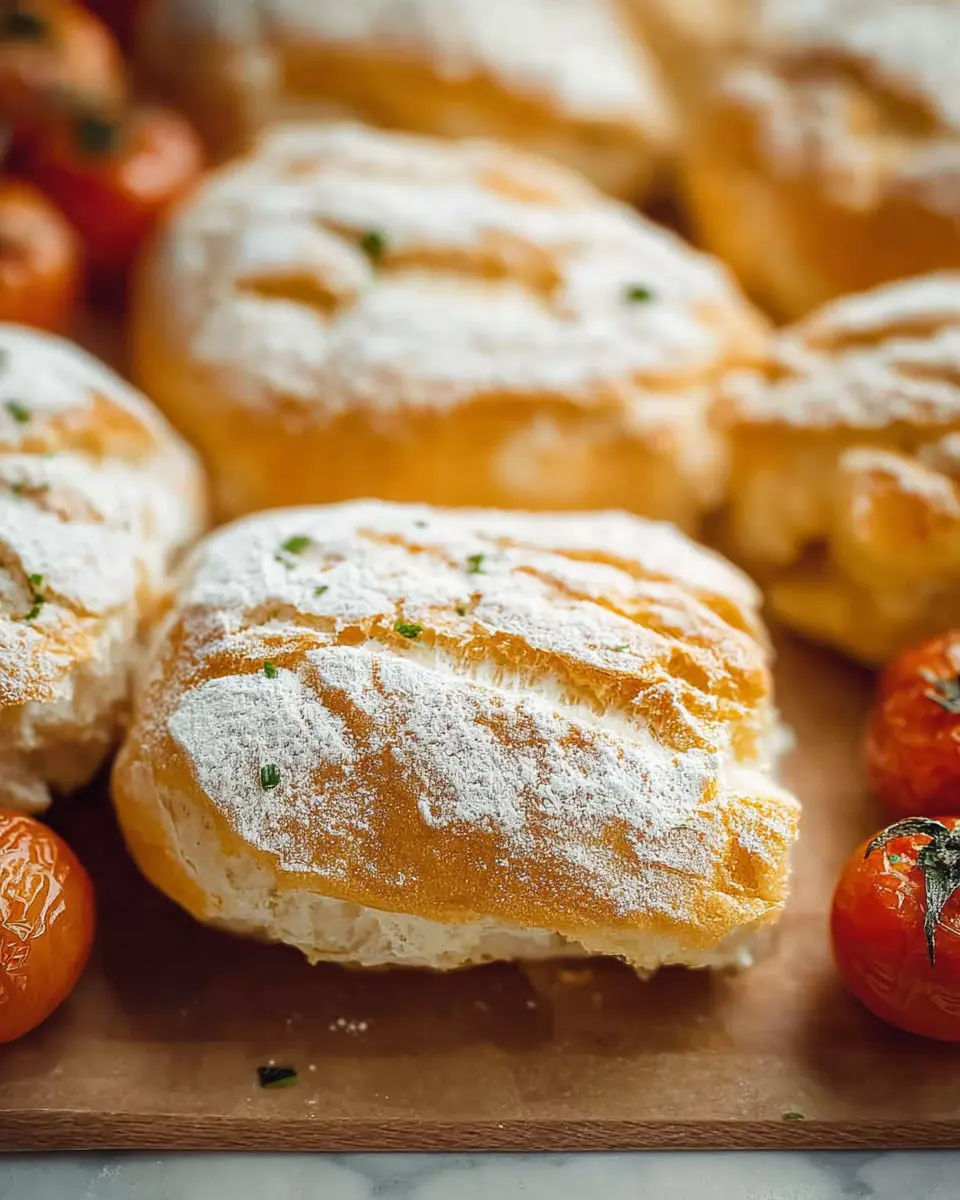
Introduction to Panini Bread
When it comes to crafting the ultimate homemade sandwiches, panini bread is truly your best friend. This Italian classic not only offers a delightful crunch but also provides the perfect canvas for your culinary creativity. Imagine sinking your teeth into a toasted sandwich filled with savory ingredients, where each bite delivers a satisfying blend of flavors and textures.
So, what makes panini bread stand out? For starters, its unique texture allows it to hold up beautifully, regardless of how generous you decide to be with fillings. Whether you’re layering on roasted vegetables, turkey bacon, or even a spread of tangy pesto, this bread will showcase your creations without falling apart. Plus, the slight crustiness of the exterior, achieved through the baking process, adds a delightful contrast to the soft interior.
If you're interested in perfecting this essential ingredient, check out resources like Serious Eats or BBC Good Food for tips on different variations and techniques. As we dive into the recipe for panini bread the Italian way, think about how you can personalize it to suit your taste—whether it's a hearty lunch or a gourmet dinner. Your culinary adventure starts now!
Ingredients for Panini Bread
Essential ingredients for your homemade panini bread
Creating the perfect panini bread requires a few basic ingredients that come together beautifully to create that crispy exterior and soft interior we all love. Here's what you'll need:
- Lukewarm water: 1 ¾ cups (420 ml)—it helps activate the yeast and create a dough that's easy to work with.
- Yeast: 2 teaspoons of active dry or instant yeast; this is your key player for that delightful rise.
- Sugar: Just ½ teaspoon to feed the yeast.
- All-purpose flour: 4 cups (500 grams) is essential for structure and texture.
- Fine salt: 1 ½ teaspoons enhances flavor.
- Olive oil: A tablespoon adds moisture and richness.
Optional add-ins for flavor and texture
Feeling adventurous? You can enhance your panini bread with optional add-ins! Consider:
- Herbs: Dried oregano, basil, or rosemary can impart an Italian flair.
- Garlic powder: A sprinkle adds a savory depth.
- Cheese: Incorporate grated Parmesan or Pecorino for extra richness.
- Seeds: Try adding sesame or flaxseed for a unique texture.
Experimenting with these optional ingredients can make your panini bread truly your own! For more inspiration, you might want to check out Serious Eats for creative ideas.
Happy baking, and enjoy your delicious homemade creations!
Preparing Panini Bread
Making panini bread is a delightful journey that perfectly captures the essence of Italian cuisine. The aroma that fills your kitchen while baking is simply irresistible. Follow these steps, and you’ll be on your way to producing the perfect bread for those delicious sandwiches.
Mix the Ingredients
Start by combining 1 ¾ cup of lukewarm water, 2 teaspoons of active dry yeast, and ½ teaspoon of sugar in a jug or bowl. Let this mixture rest for about five minutes until it becomes foamy. This step is crucial as it activates the yeast, ensuring your bread rises beautifully. If you're using instant yeast, feel free to incorporate it directly with the flour, following the manufacturer's guidelines. In a separate large bowl, whisk together 4 cups of unbleached all-purpose flour and 1 ½ teaspoons of fine salt. Next, pour in the foamy yeast mixture along with 1 tablespoon of olive oil, blending it all together until there are no dry flour remnants. If necessary, add a touch more water to reach the ideal dough consistency.
Let the Dough Rise
Now, it’s time for the dough to rise! Cover your bowl with a damp kitchen towel or cling film and place it in a warm oven (which you should preheat to 250℉/120℃ before turning it off). Allow the dough to rest for about 30-40 minutes. This warm environment helps the dough rise faster, giving you those airy bubbles that make panini bread so delightful. While you’re waiting, perhaps you can scroll through some delightful recipe ideas or brush up on your Italian cooking techniques on websites like The Kitchn or Serious Eats.
Shape the Dough
After the dough has risen, it should look fluffy and slightly bubbly. Carefully scrape it from the bowl onto a floured surface—be gentle, as you don’t want to deflate any of that precious air you just created! Divide the dough into 10 pieces using a dough scraper or a large knife, dusting with a bit of flour if needed. Shape each piece into a small round or oval, depending on your preference. Place them on a parchment-lined baking sheet.
Bake the Panini Bread
With your oven now preheated to a toasty 440℉/220℃, it’s time to bake! Slide your baking sheet into the oven and let those delightful pieces of dough bake for around 20-25 minutes. Keep an eye on them—you want them to turn golden brown and develop a crusty exterior. Trust me, the smell will be irresistible!
Cool and Store Properly
Once baked, remove your panini bread from the oven and let them cool for a few minutes on a wire rack. This helps maintain their crusty exterior. If you’re not using them right away, place them in an airtight container or a zip-top bag to keep them fresh. Homemade panini bread is best enjoyed within a few days, but you can freeze any extras for later use. Just pop them in the toaster or warm them in the oven for a quick and delightful meal!
With these simple steps, you’ll have the perfect panini bread as the cornerstone for your next culinary creation! Enjoy your bread-making adventure!

Variations on Panini Bread
Herb-infused Panini Bread
Looking to add some flair to your panini bread? Infuse the dough with your favorite herbs! A combination of rosemary, thyme, or basil will elevate the flavor profile, giving you a delightful twist. Simply chop fresh herbs and fold them into the dough after the first rise. This adds not only flavor but also a beautiful aroma that will have your kitchen smelling irresistible.
Whole Wheat Panini Bread
For a healthier alternative, consider making whole wheat panini bread. Substitute half or all of the all-purpose flour with whole wheat flour for richer taste and added nutrition. This option increases fiber and can help keep you feeling fuller longer. Just remember, whole grains absorb more water, so adjust the liquid accordingly! Discover the health benefits of whole grains through resources like the Whole Grains Council.
With these variations, your panini creation will impress friends and family!
Cooking Tips for Perfect Panini Bread
Ensuring the Right Dough Consistency
To achieve perfect panini bread, focus on the dough's consistency. It should be soft and slightly sticky, but manageable. Always start with the water measurement in the recipe, and feel free to add a bit more if the dough seems too dry. The goal is to have a pliable dough that can hold its shape without collapsing, which is crucial for a delightful texture.
Using a Warm Oven for Faster Rising
A warm oven is your best friend for speeding up the rise of the dough. Preheat to 250°F (120°C) and then turn it off before placing your covered bowl inside. This creates an ideal environment for the yeast to work its magic, resulting in fluffy, airy bread. For more tips on yeast activation and rising tricks, check out this article on The Science of Yeast.
By following these simple tips, you’ll elevate your panini bread to a whole new level, making every bite irresistible!

Serving Suggestions for Homemade Panini
Popular Fillings to Complement Your Panini Bread
When it comes to creating delicious paninis, the key is in the fillings! Here are some fan-favorites to elevate your homemade panini bread:
- Turkey Bacon & Avocado: A hearty and healthy combo that adds richness.
- Chicken Ham & Gruyère: Perfect for a savory experience with a touch of nutty flavor.
- Caprese Style: Fresh mozzarella, basil, and tomatoes drizzled with balsamic glaze for a refreshing bite.
- Roasted Veggies & Pesto: A vegetarian delight packed with flavor and nutrition.
Creative Ways to Serve Paninis
Consider these creative serving ideas to enhance your paninis:
- Side Salads: Pair your panini with a light arugula salad, drizzled with lemon vinaigrette.
- Dipping Sauces: Think spicy mustard or a homemade aioli for that extra punch of flavor.
- Charcuterie Platter: Serve sliced paninis alongside cured meats, cheeses, and olives for a fun twist.
These additions not only complement your paninis but also make your meal memorable and appealing!
Time Details for Making Panini Bread
Preparation Time
Getting started with your panini bread dough will take about 15 minutes. This includes mixing your ingredients and getting them ready for rising.
Rising Time
Allow the dough to rise for 30 to 40 minutes. Placing it in a warm oven helps it rise beautifully, making for a light and airy bread.
Baking Time
Once shaped, your panini bread will need 20 to 25 minutes in the oven to reach that perfect golden crust.
Total Time
From start to finish, you’ll be looking at approximately 1 hour and 10 minutes to enjoy your delicious homemade panini bread!
Remember, the joy of baking is both in the process and the reward at the end. Happy baking!
Nutritional Information for Panini Bread
When you're enjoying a delicious homemade panini bread, it’s great to know what you're eating. Here’s a quick breakdown of the nutritional info per serving:
- Calories: 196 kcal
- Carbohydrates: 39 g
- Protein: 5 g
This hearty bread is not just a perfect base for your favorite fillings but also a source of energy to keep you going throughout the day. If you're curious about more details on nutrition, consider checking resources like the USDA FoodData Central for comprehensive data.
FAQs about Panini Bread
Can I freeze panini bread?
Absolutely! Panini bread freezes beautifully, making it a great way to prep ahead. Once the bread has cooled completely, wrap it tightly in plastic wrap or aluminum foil, then place it in a resealable freezer bag. It can last up to three months in the freezer. When you're ready to enjoy it, simply thaw it at room temperature and consider reheating for the best texture.
How do I reheat leftover panini bread?
To reheat your panini bread and restore its delightful crustiness, preheat your oven to 350°F (175°C). Place the bread on a baking sheet and warm it for about 5-10 minutes, or until heated through. For a quicker option, you can use a toaster oven or skillet, just be cautious not to overheat it and dry it out.
What’s the best way to store my panini bread?
For optimal freshness, keep your panini bread in an airtight container at room temperature for up to two days. If you want to preserve it longer, refrigerating could dry it out, so stick to freezing instead. Keeping the crust intact helps maintain that wonderful texture, so try to avoid slicing until you’re ready to use it!
Conclusion on Homemade Panini Bread
Making your own panini bread is a rewarding experience that elevates any meal. Not only does fresh bread taste infinitely better, but it also allows you to control ingredients and tailor flavors to your liking. Try this simple recipe today, and enjoy the delectable aroma of homemade bread wafting through your kitchen!
Why You Should Start Making Your Own Panini Bread Today
If you've ever enjoyed a deliciously toasted panini at a café, why not recreate that experience at home? Here are some great reasons to start crafting your own panini bread:
- Freshness: There’s nothing like the aroma of warm, freshly baked bread.
- Customization: Control ingredients, making it healthier or tailoring it to specific dietary needs.
- Cost-Effective: Save money by making your own instead of buying expensive artisanal bread.
- Skill Building: Bread-making is a wonderful skill to learn; it's fun and satisfying!
- Impress Friends and Family: Homemade panini bread can elevate gatherings and make you seem like a culinary expert.
With a few basic ingredients and a bit of time, you can whip up a batch of panini bread that’s perfect for your next sandwich creation or as a side for soups and salads. Happy baking!
For more insights on bread-making, consider checking resources like King Arthur Baking for tips and techniques.

Panini Bread, The Italian Way
Equipment
- mixing bowl
- oven
- Baking Sheet
- Parchment paper
- dough scraper
Ingredients
Dry Ingredients
- 4 cups unbleached all-purpose flour plus more for dusting
- 1.5 teaspoon fine salt
Wet Ingredients
- 1.75 cup lukewarm water plus more if needed
- 2 teaspoon active dry yeast or instant yeast
- 0.5 teaspoon sugar
- 1 tablespoon olive oil (15 ml)
Instructions
Preparation
- Mix water, yeast, and sugar in a jug or bowl and let it rest until foamy (about 5 minutes). If using instant yeast, add it directly to the flour.
- Combine flour and salt in a large bowl.
- Preheat the oven to 250℉/120℃ and turn it off.
- Add the liquid to the dry ingredients, add olive oil, and mix with a spoon or a spatula to incorporate the flour. Mix well until no dry flour remains.
- Cover the bowl with a damp kitchen towel or cling film, place it in the warm oven, and let it rest for 30-40 minutes.
- After this proving time, remove the dough from the oven, preheat it to 440℉/220℃, and cover a large baking sheet with parchment paper.
- Gently scrape the edge of the bowl and pour the dough on a floured working surface.
- Dust the dough with flour, and using a dough scraper or a large knife, divide it into 10 small pieces.
- Gently roll out each portion, dusting hands and surface with flour if needed. Place each piece of dough on the baking sheet.
- Bake for about 20-25 minutes until golden and crusty.


Leave a Reply